Degassing Silicone: How to Get Bubbles Out of Silicone
________________________________________________________________________
Silicone mold-making and resin casting should be fun.
But when those nasty bubbles show up? It ruins everything. You pour a perfect design; by the next day, all you see are craters and defects.
This guide fixes that. If you have ever wondered how to get bubbles out of silicone rubber without the stress, you are in the right place.
We’ll cover simple methods that actually work, whether you have a vacuum chamber or not. Along the way, you’ll get practical steps, expert tips, technical parameters, and even a bit of science, because the more you know, the smoother your molds.
The Importance of Accurate Mixing Ratios
Step-by-Step Guide: Mixing Silicone Using the Two-Container Method
What is Degassing and Why It Works
How to Degas Silicone with a Vacuum Chamber
Step-by-Step Process For How To Get Bubbles Out Of Silicone
Troubleshooting Problems With How To Get Bubbles Out Of Silicone
Problem #1: Cloudy or bubbly surface
Problem #2: Large random bubbles
Problem #3: Bubbles in corners
Problem #4: Persistent microbubbles
Easy Tricks to Minimize Bubbles Without a Vacuum Chamber
Why Bubbles Form in Silicone
Before answering the question of how to get bubbles out of silicone, you need to understand why they appear in the first place.
Bubbles are normal. Silicone traps air easily. Beginners often mix too fast or pour too quickly. But that’s just the start.
Common reasons for bubbles include:
- Fast stirring that pulls air into the mix.
- Incorrect mixing ratios causing uneven curing.
- Pouring onto porous materials like untreated wood or foam.
- Air trapped in corners, undercuts, or fine details.
- Expired or poorly stored rtv silicone.
- High humidity, which can accelerate or interfere with curing.
Studies on PDMS (polydimethylsiloxane) molds found that air bubbles can survive even after an hour of degassing if silicone is poured over porous tape. Another study confirmed that curing at higher temperatures (around 65 °C) can cause trapped air to expand, creating fresh bubbles during the curing process.
Thicker silicones, anything over 30,000 mPa·s viscosity, are more likely to trap air because the bubbles have low buoyancy. They move slowly and often stay put until the silicone cures.
Pro tip: Smart mold makers pour silicone in thin layers instead of one big dump. It gives trapped air more time to escape between pours.
The Importance of Accurate Mixing Ratios
Mixing ratios aren’t suggestions when figuring out how to get bubbles out of silicone. They’re exact requirements. Get them wrong, and you’ll end up with a sticky mess or brittle mold. Both will have bubbles.
Rules for accurate mixing:
- Measure by weight unless your product says otherwise.
- Use a digital scale for precision.
- Follow the ratio exactly — if it says 10:1, then 100 g of Part A needs 10 g of Part B.
Tests on high-viscosity silicone show that proper mixing improves bubble escape and curing consistency. Under-catalyzed silicone stays soft. Over-catalyzed silicone hardens too fast, trapping bubbles before they can rise.
Technical parameter check:
- Viscosity: Measured in mPa·s. Higher viscosity means thicker flow and more bubble retention.
- Shore Hardness: Determines mold flexibility. Softer grades (Shore A 10–20) release bubbles easier than harder grades.
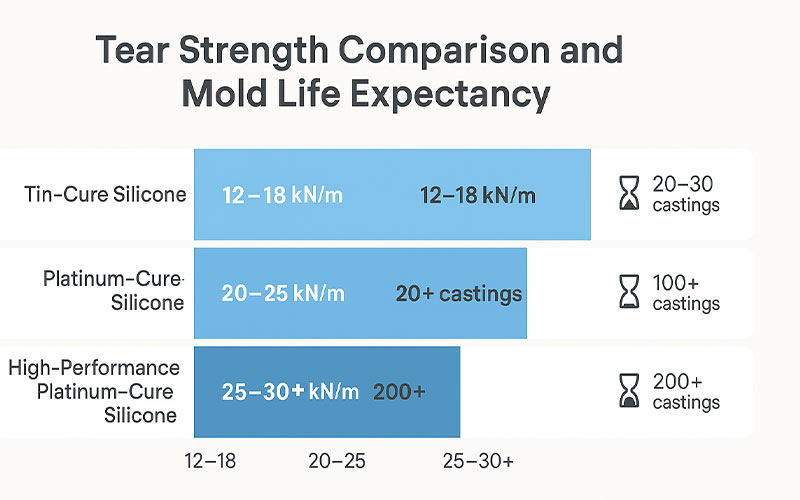
- Tear Strength: High tear strength (≥20 kN/m) prevents ripping during demolding and extends mold life.

Alt Text: Horizontal bar chart showing tear strength and mold life for different silicone types, illustrating how to get bubbles out of silicone by choosing the right material
When you get the ratio right, molds last longer, details stay sharp, and issues relating how to get bubbles out of silicone drop dramatically.
Learn more in our [Ultimate Guide to Mold Making Silicone].
Step-by-Step Guide: Mixing Silicone Using the Two-Container Method
This method is simple and works for both beginners and pros. It reduces the problems associated with how to get bubbles out of silicone before you even start degassing.
Step 1: Measure Part A and Part B precisely on a digital scale. Use separate tools for each part to avoid contamination.
Step 2: Pour both into a wide container. Stir slowly, scraping the sides and bottom. No aggressive whisking — think smooth folding motions.
Step 3: Transfer the mixture into a clean container. This “double potting” removes unmixed streaks and improves curing consistency.
Step 4: Mix again with the stretch-and-fold method. Imagine folding bread dough; gentle and deliberate.
Why it works:
- Scraping avoids unmixed spots.
- Folding stretches air pockets, helping them escape.
- It produces a more uniform mixture with fewer bubbles before degassing.
Pro Tip: Let the silicone rest for 2–3 minutes before pouring. Surface bubbles will pop naturally.
What is Degassing and Why It Works
Degassing is the process of removing trapped air from your mixed silicone before you pour it. It’s the single biggest step to getting bubble-free molds. Benefits of degassing:
- Preserves fine details.
- Prevents internal air pockets that weaken the mold.
- Creates smoother, clearer surfaces.
A controlled vacuum can reduce degassing time by over 60% compared to a standard pump. This improves efficiency and reduces human error in both professional and hobby setups.
How to Degas Silicone with a Vacuum Chamber
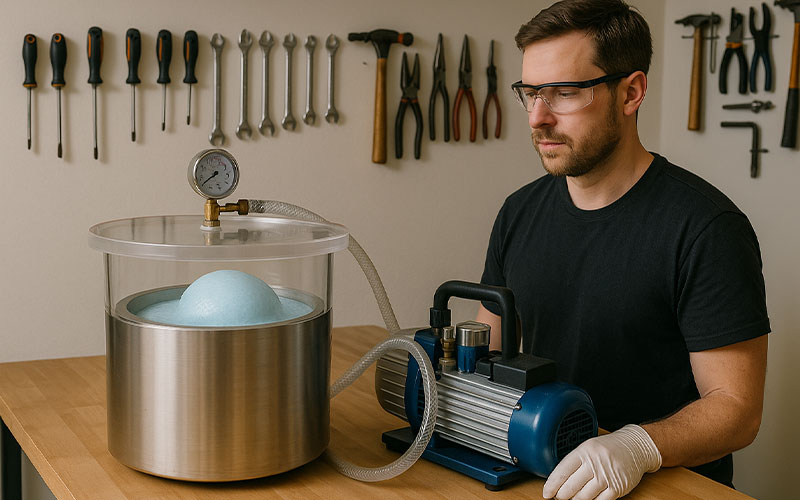
A vacuum chamber might sound like overkill. It isn’t when it comes to solving problems related to how to get bubbles out of silicone. Think of it as your mold’s insurance policy. Its job is simple; pull the air out so your silicone sets without tiny craters hiding in the details.

Alt Text: Technician degassing pale blue silicone in a vacuum chamber to show how to get bubbles out of silicone, with tools neatly arranged in the workshop background.
What You’ll Need
- A vacuum chamber with a tight-sealing lid: A clear lid is ideal. You can watch the silicone react instead of guessing what’s going on inside.
- A vacuum pump: Oil-free pumps stay cleaner. Oil-based pumps can hit stronger vacuums faster. Aim for a pump that pulls at least 29 inHg (around 98 kPa) to make efficient vacuum degas .
- A tall mixing container: Silicone rises a lot during degassing. Leave room so it doesn’t bubble over.
- Food-safe silicone spray (optional): Makes cleanup easier if things get messy.
Step-by-Step Process For How To Get Bubbles Out Of Silicone
Step 1: Mix your silicone.
Measure Parts A and B with a digital scale. Mix thoroughly using the two-container method. Work quickly; your pot life starts the second the catalyst hits the base.
Step 2: Transfer to a tall container.
Only fill it one-third of the way. Silicone can rise two or three times its height before it collapses.
Step 3: Place it in the chamber.
Center the container. This keeps the rising silicone from touching the lid or sides and messing with the seal.
Step 4: Seal the lid.
Check the gasket. Any dust or dried silicone will cause leaks and weaken the vacuum.
Step 5: Start the pump slowly.
Open the valve gradually. If you rush, the silicone can boil over instantly. You’ll see foam and bubbles. That’s just the trapped air making its way out.
Step 6: Let it boil under vacuum.
At full vacuum, the silicone will foam dramatically. Watch closely. Within a couple of minutes, the bubbles will pop and the foam will collapse. For silicones under 20,000 mPa·s, 3–5 minutes is usually enough.
Step 7: For thicker silicones, take your time.
If the viscosity is above 30,000 mPa·s, run short cycles. Three minutes on, a short pause, then back on. Keep going until 8–10 minutes have passed. This stops boil-overs and keeps things under control.
Step 8: Release the vacuum slowly.
Turn off the pump. Crack the valve open gently so you don’t disturb the silicone’s surface.
Step 9: Pour right away.
Degassed silicone doesn’t stay bubble-free forever. Get it into the mold while it’s still perfect.
Watch this step-by-step degassing process video for a visual walkthrough.
Pro Tips for Best Results
- Warm the silicone to 30–35 °C before mixing. Lower viscosity means bubbles escape faster.
- Always leave 2–3 times the expansion space in your container.
- Keep pump oil clean if you use an oil-based pump. Dirty oil means weaker suction and possible pump damage. For molds with sharp or tiny details, brush on a thin layer of silicone before pouring the rest. This keeps air from getting trapped.
Troubleshooting Problems With How To Get Bubbles Out Of Silicone
Even when you do everything right, bubbles happen. Here is how to troubleshoot issues with how to get bubbles out of silicone and fix it fast:
Problem #1: Cloudy or bubbly surface
Cause: Cold workspace or mixing too fast
Fix: Casting at room temperature. Mix slow and steady.
Problem #2: Large random bubbles
Cause: Pouring onto a porous surface or skipping degassing
Fix: Seal the surface before pouring. Give it extra time in the chamber.
Problem #3: Bubbles in corners
Cause: Air trapped during the pour
Fix: Tilt the mold slightly as you pour. Tap the edges to help air escape.
Problem #4: Persistent microbubbles
Cause: Silicone too thick or degassed too quickly
Fix: Warm the silicone to lower viscosity. Run longer or multiple degassing cycles.
Easy Tricks to Minimize Bubbles Without a Vacuum Chamber
No chamber for how to get bubbles out of silicone? You can still make near-perfect molds.
Here is how:
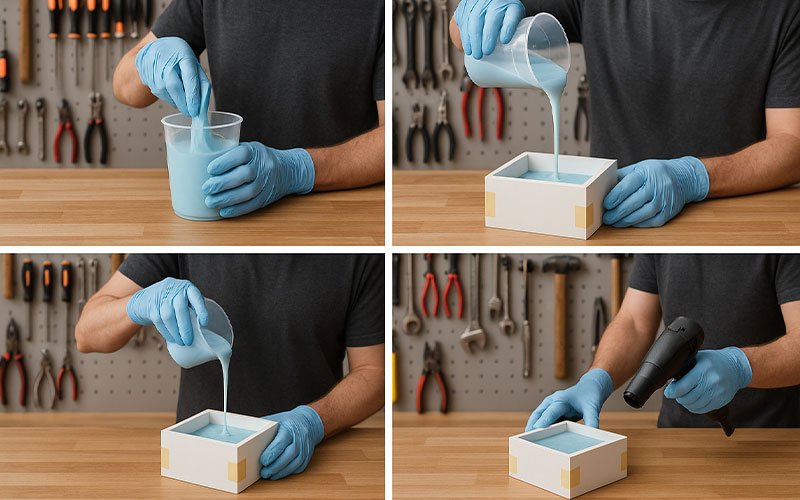
- Stretch and fold your silicone while mixing: prevents air entrapment
- Pour from a height in a thin stream: helps pop surface bubbles
- Tap or vibrate the mold after pouring: releases air pockets stuck in corners
- Use a heat gun or hair dryer lightly across the top after pouring: bursts small bubbles before curing
For smaller jobs, people can just let their mixed silicone sit there for 10-15 minutes before pouring. This lazy approach actually works great.

Alt Text: Four-step guide on how to get bubbles out of silicone without a vacuum chamber, showing folding silicone in a cup, pouring in a thin stream into a mold, tapping the mold on a workbench, and using a heat gun in a bright workshop.
Those tiny bubbles float up on their own without any fancy equipment. Just throw a cover over the container so dust doesn’t mess things up while waiting.
Here’s a neat trick when someone’s figuring out how to get bubbles out of silicone – warm up both parts in some warm water first, around 30-35°C. Warmer silicone flows like honey instead of thick syrup, so bubbles slip out much more easily.
One more thing that works wonders with detailed models – brush a super-thin coat of silicone over all those intricate parts before doing the main pour. This stops air from getting trapped in tight spots and makes the final mold way sharper.
You can also explore our full range of RTV-2 silicone products designed for high-detail, bubble-free results.
Conclusion
Silicone molds don’t have to be a game of luck. Once you learn how to remove air bubbles out of silicone, you stop crossing your fingers and start getting consistent results.
It’s all about control. Accurate ratios keep the chemistry right. The two-container method makes sure everything blends evenly.
Degassing, whether in a vacuum chamber or with smart no-chamber tricks, clears the path for smooth, detailed molds.
Add habits like warming your mix, pouring in thin streams, and pre-brushing details, and you’ll see the difference fast. Great molds are made before the pour. Every choice,from viscosity to pouring method, adds up.
Keep refining your process, and bubble-free molds won’t just be possible. They’ll be your standard.