

Best Silicone for Miniature Molds: Beginner’s Guide
Ready? Then let’s pour!
Why Your Silicone Choice Matters
Tiny models leave no place for errors. When a 1 mm buckle on a 28 mm knight looks mushy, you see it right away.
Your players see it, and even your client sees it. The secret often hides in the mold casting material rather than your sculpture. That is why learning how to pick the best silicone for miniature molds is the first upgrade every hobbyist, studio painter, or small-batch manufacturer should make.
This beginner guide breaks the jargon into plain talk, covers the essentials of silicone mold making, and ends with a free sample of Topsil’s silicone you can pour tonight:
- Best Silicone for Miniature Molds: Beginner’s Guide 1
- Why Your Silicone Choice Matters 2
- Key Properties That Control Your Results 2
- Viscosity 2
- Tear Strength 3
- Cure Profile 3
- Shore A Hardness 3
- Platinum Vs Tin Silicone: The Face-Off 4
- Tin-Cure Pros & Cons 5
- When to Use Tin-Cure? 5
- Platinum-Cure Pros & Cons 5
- When to Use Platinum-Cure? 6
- The Shore-Hardness Cheat Sheet for Miniatures 6
- How to Keep Air Bubbles Out 7
- Extra Tips to Get Bubble-Free Molds: 7
- Environmental and Safety Points 8
- Product Selector: Topsil Platinum-Cured Series 8
- Your Purchase Checklist: Step by Step 9
- FAQs 10
- Time To Claim Your Sample 10
Silicone looks simple. You simply open the kit, mix Part A and Part B. Then, after waiting for some time, you demold, and it’s done. Yet different RTV-2 formulations feel like entirely different materials once the mold sees a sharp sword tip or a deep recessed eye socket.
Pick a grade that is too hard, and you may rip the master or ruin the mold to make when you flex the cavity. Pick one that is too soft, and the mold collapses and ruins the crisp surface texture. Pick one that cures too slowly, and bubbles have time to rise, yet the shop schedule drags.
Pick one that cures too fast, and you barely finish mixing before the cup turns solid. The right balance makes the perfect silicone rubber, saving time, money, and miniatures.
Casting resin adds more pressure, and polyurethane resin and epoxy resin heat up. Cheap tin-cure silicones break down. Platinum-cures survive but only if you avoid cure inhibition.
When you understand viscosity, Shore A hardness, tear strength, and cure profile, you can match the best silicone for miniature molds to every sculpt and perfect mold release. That knowledge is what turns hobby casting into small-business production.
Key Properties That Control Your Results
Viscosity
This determines how deep the liquid silicone flows into tiny crevices.
Mold material like a 4000 cP platinum flows like honey on a warm day. A thick 20000 cP tin feels like peanut butter. For delicate relief on coin-sized bases, a low-viscosity formula helps the silicone flow into every crevice of the moulds to make. For large terrain tiles, a thixotropic paste stays put on vertical surfaces.
It will not slump over the edge, ensuring your casting silicone performs optimally.
Image:
Alt: Low-viscosity best silicone for miniature molds flowing into another container.
Tear Strength
Tear strength speaks for itself. Once you split the mold along a seam, the silicone pulls like caramel. Cheap blends tear at 10 kN/m. Premium platinum blends sit near 22 kN/m. High tear strength prevents a short life. It also means you can cut tight gates without fear, making it a key feature of the casting silicone.
Cure Profile
Cure profile covers pot life and demold time. Pot life is the working window after mixing. Demold time is when you can safely remove the master. Long pot life (40 min) suits newcomers and complex two-part or multi-part pours.
Fast demolding (2 h) keeps a production line humming. Heat post-cure at 60 °C, and you may cut demold time in half. Just check the data sheet first to ensure you’re using the best silicone for miniature molds.
Shore A Hardness
Shore hardness for small molds tells you how flexible the cured mold will feel. The ASTM D2240 scale puts a pencil eraser around 40 A. A rubber band hovers at 25 A. Miniature molds live between 20 A and 35 A.
Softer grades peel away from sword hilts without tearing. Harder grades hold shape when you strap the mold into a pressure pot. Remember, the best silicone for miniature molds balances flexibility and durability.
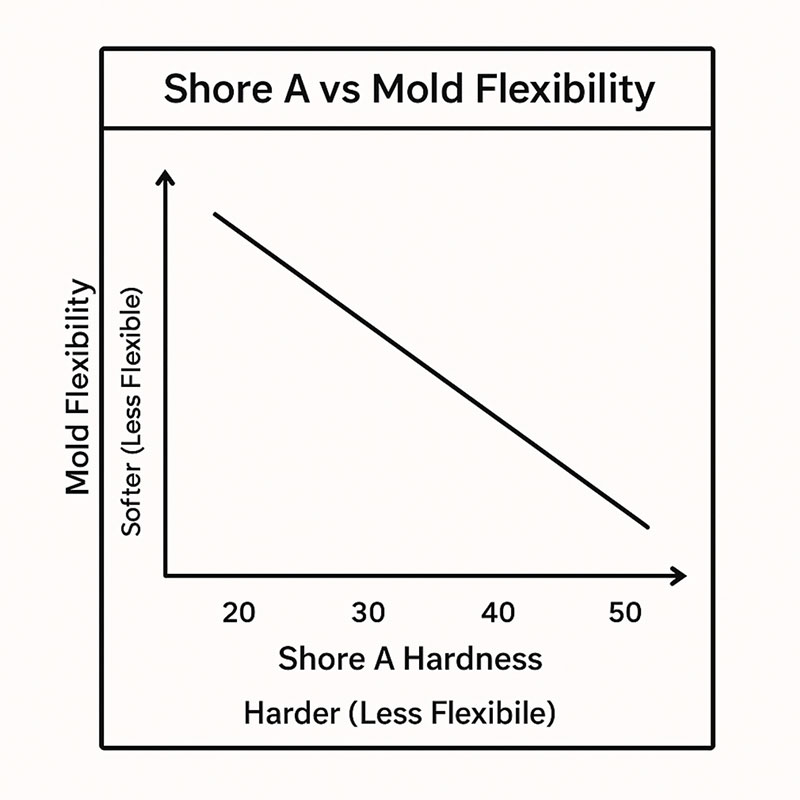
Alt: Graph showing inverse relationship between Shore A hardness and mold flexibility to help select the best silicone for miniature molds.
You can also refer to the ASTM D2240 hardness scale for another reference point.
Platinum Vs Tin Silicone: The Face-Off
Tin-cure silicone, also known as condensation-cure, has been the standard for decades.
It’s budget-friendly. It tolerates a wide range of materials like clay and sulfur-based modeling compounds. For low-stakes or throwaway molds, it still gets the job done. But it has limitations. Tin-cure shrinks by about 1%.
It releases acetic acid during cure. It loses elasticity after a few dozen pulls. Most molds made from tin-cure become brittle after 20 to 30 casts, unlike the best silicone for miniature molds, which offers greater durability.
Platinum-cure silicone, or addition-cure, is the modern alternative. It costs more upfront but pays off over time.
Shrinkage in RTV2 silicone miniatures is virtually zero. Tear resistance is stronger. It lasts over 100 uses when cared for. It’s also the most suitable silicone for food-contact applications or skin-safe prosthetics. But platinum is pickier. It can fail to cure if exposed to sulfur, amines, or latex gloves.
Here’s a quick comparison table to make things clearer:
| Feature | Tin-Cure RTV | Platinum-Cure RTV |
| Shore A Range | 20–60 | 10–50 |
| Typical Shrink | 1 % | 0.1 % |
| Tear Strength | Medium | High |
| Cure Inhibition | Low sensitivity | High with sulfur, amines |
| Lifespan | 20–30 casts | 50–100+ casts |
| Cost per kg | Low | High |
| Food Contact | No | Possible |
Tin-Cure Pros & Cons
Pros
- Lower cost for short-term use
- Less sensitive to surface contamination
- Good for use with sulfur-based clays
- Longer shelf life of uncured components
Cons
- Shrinks noticeably after curing
- Becomes brittle quickly
- Not food safe
- Releases a vinegar-like odor
When to Use Tin-Cure?
Go with tin-cure if you’re working with sulfur-rich clay or need something cheap to use to make simple or single-use molds. It’s not the most ideal silicone for high-detail work in miniature molds, but it suits hobbyists on a tight budget or anyone doing fast turnaround molds where longevity isn’t critical.
Platinum-Cure Pros & Cons
Pros
- Excellent detail reproduction
- Minimal shrinkage
- Long-lasting and durable
- Safe for food and skin (if certified)
- High tear strength
Cons
- More expensive
- Sensitive to surface inhibition (e.g., sulfur, latex, amines)
- Requires clean tools and workspace
When to Use Platinum-Cure?
Use platinum-cure for making silicone mini molds when the stakes are higher. Choose it for production-grade molds, detailed miniatures, or anything you need to last. It’s the best silicone for miniature molds for tabletop miniatures, resin mold, candy or chocolate molds, and any project where consistency and fine surface capture matter.
Why ever use tin? It tolerates clay with sulfur. It is cheaper for quick one-off resin pours. Why pay for platinum? You need high detail. You want more copies. You need near-zero shrink. You plan to cast edible chocolate tokens. The best silicone for miniature molds over the long run is usually platinum.
It pays back once you amortize across fifty perfect figures using high-quality silicone mold making kit.
For a deeper chemistry dive, visit the Smooth-On technical bulletin tutorial on cure inhibition.
The Shore-Hardness Cheat Sheet for Miniatures
| Miniature Type | Typical Scale | Undercut Complexity | Recommended Shore A |
| RPG hero at 28 mm | 1:60 | High | 20 A |
| 32 mm War-Game elite | 1:56 | Medium | 22 A |
| 54 mm display bust | 1:32 | Low | 25 A |
| 1:35 tank tracks | 1:35 | Moderate | 25 A |
| 75 mm resin statue | 1:24 | Low | 30 A |
| Tabletop terrain tile | N/A | Very low | 35 A |
Use the table like a GPS for mould making. Find the scale, map the undercut complexity, and pick the Shore A. Softer silicone bends around fragile ankles. Harder silicone stands tall when you strap rubber bands during pressure-casting. Keep one rule in mind: smaller scale means softer silicone, bigger parts tolerate stiffer grades to ensure you’re using the best silicone for miniature molds.
How to Keep Air Bubbles Out
Nothing ruins the first pour like trapped bubbles. Every paint wash later highlights the crater. That one little air pocket turns into a crater under a magnifying lamp. The good news? You can avoid most of them with the right prep using the best silicone for miniature molds.
The easiest fix is a vacuum chamber.
Image:
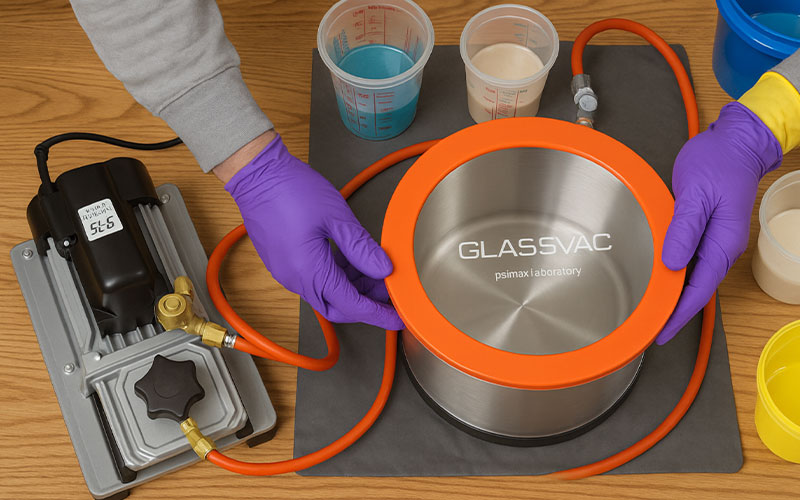
Alt: Vacuum degassing setup for bubble-free silicone casting using the best silicone for miniature molds
Mix your RTV silicone rubber thoroughly, then place the cup inside the chamber. Pull down to –0.9 bar and hold for about sixty seconds. You’ll see the foam rise, swell, and collapse. Once that stops, you’re ready to pour for bubble-free silicone casting.
If you don’t have vacuum gear, pressure casting is your backup plan to make molds. After pouring the best solution to make silicone molds, place the mold into a pressure pot and crank it to 60 psi. It compresses them so small they’re invisible in cured resin. Your final cast looks like glass.
Surface tension also plays a role in bubble-free silicone casting when you make a mould. A drop of liquid silicone surfactant, like Sil-Aid (or even diluted dish soap) breaks the surface energy.
That helps air slide off the master, especially in tight crevices, when using the best silicone for miniature molds.
Extra Tips to Get Bubble-Free Molds:
- Warm the best silicone for miniature molds slightly before mixing to reduce viscosity and improve flow. Don’t overheat.
- Use two containers: one for mixing, and one for pouring. This reduces trapped air introduced during mixing.
- Degas both parts separately before combining, especially for larger batches.
- Use a slow, steady stir when mixing for best results. Fast whipping adds bubbles.
- Pour from a height in a thin stream to minimize trapped air and let the silicone fill the mold evenly.
- Always seal porous masters like wood or 3D prints with shellac or PVA before pouring the silicone mixture.
Master these techniques, and your next mold will be clean, crisp, and free from lunar craters.
Environmental and Safety Points
Platinum silicone smells mild. Tin silicone can smell like vinegar. Even so, wear gloves. Use a respirator if you atomize anything.
Resin dust from sanding cured casts is the real lung enemy. Cured silicone goes to landfill as inert rubber. Uncured spills wipe with paper towel, then fully cure in trash before disposal. Make sure you always follow local regulations when you make a mold.
Nose complaints from neighbors hurt faster than chemical exposure. Platinum formulas are often FDA-compliant once post-cured at 150 °C. Check the certificate if you plan to mold candy with silicone rubber.
Image:
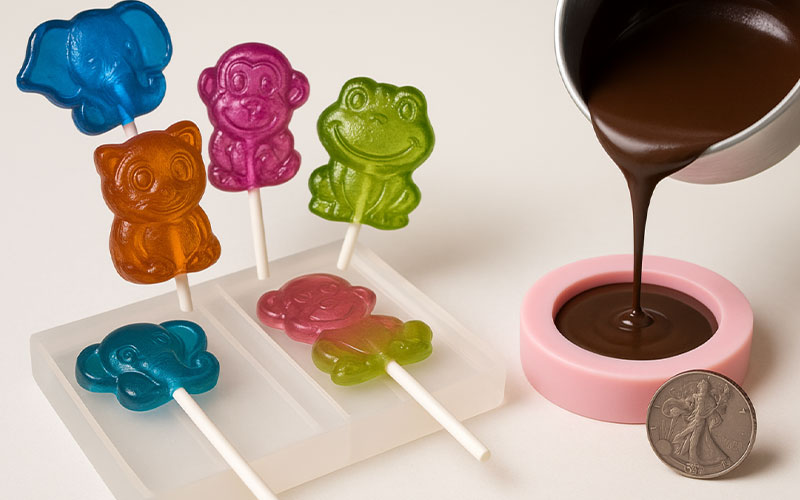
Alt: Food-safe best silicone for miniature molds casting candy.
Both tin and platinum qualify as REACH safe in Europe when making moulds, but always read the SDS sheet. Ignorance never defends in court. Discover our food-grade silicone products for safe, compliant miniature molds.
Product Selector: Topsil Platinum-Cured Series
Topsil kept hobbyists in mind when designing three workhorse grades. All meet or beat the numbers from premium brands while banking-friendly pot life for beginners. Every sample ships with equal-weight Part A and Part B. Mix one to one by weight or volume to create the best silicone for miniature molds.
| Grade | Shore A | Viscosity (cP) | Tear Strength (kN/m) | Pot Life | Demold | Ideal Use |
| S-25 | 25 | 4 000 | 22 | 40 min | 4 h | RPG minis with thin blades |
| S-30 | 30 | 6 000 | 20 | 35 min | 3 h | 1:35 armor or busts |
| S-40 | 40 | 8 500 | 18 | 30 min | 2 h | Large terrain pieces |
Choosing feels easy. Match Shore A from the earlier cheat sheet. Check the pot life to match the mixing habit. Order a free 200 g sample of the best silicone for miniature molds. Pour. Evaluate.
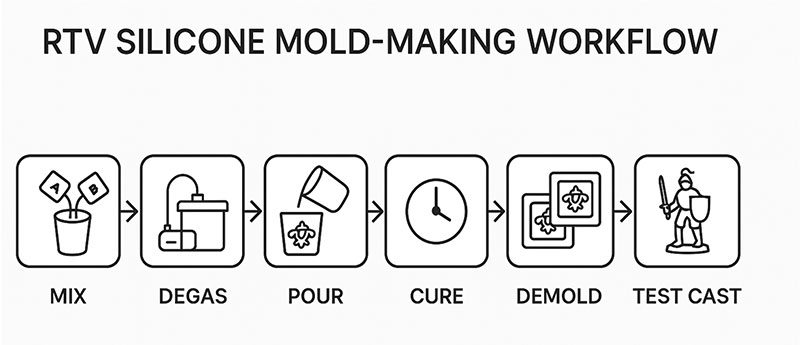
Alt: RTV silicone mold-making process flowchart showing six steps: mix, degas, pour, cure, demold, and test cast using the best silicone for miniature molds.
Your Purchase Checklist: Step by Step
- Match the Shore: Use the cheat sheet. Softer for tiny models, harder for larger parts. That’s how you find the silicone you need.
- Confirm pot life: If you dual mix the cup and vacuum, you need time. 40 min feels safe optimum results.
- Scan for cure inhibition: Jewellery clay with sulfur or latex gloves kills the platinum cure. Barrier coat with PVA if you are not confident whether your silicone for mould making will cure properly.
- Plan degassing: Vacuum equipment, pressure pot, or both. Decide before you stir the silicone mixture.
- Test the sample: Pour a single-part mold. Measure detail. Count bubbles. Flex cavity. Only then, place the bulk order for the best silicone for miniature molds.
FAQs
How do I stop cure inhibition on 3D printed masters?
Wash the resin print in fresh isopropyl alcohol until no slick remains. Post-cure under UV for at least thirty minutes. A thin coat of PVA release agent should be brushed on as extra insurance. Platinum silicone then cures clean, ensuring the best silicone for miniature molds performs reliably.
Can I pigment platinum silicone without messing up the cure?
Yes. Use silicone safe pigments at less than two percent by weight. Avoid artist oil paints that contain sulfur or amines. They block polymerization, which can ruin the best silicone for miniature molds.
What is the shelf life of unused RTV2 silicone miniature?
Sealed containers last twelve months at room temperature below 25 °C. Remix Part A before each use because fillers settle. Discard if viscosity climbs sharply to maintain the quality of the best silicone for miniature molds.
Time To Claim Your Sample
You now know how viscosity flows, how Shore A bends, why platinum wins, and which Topsil grade matches your miniature army. The only thing left is practice with the best silicone for miniature molds. Click here to request a free 500 g sample of Topsil S-25, S-30, or S-40.
Pour the silicone tonight. Hold a bubble-free cast tomorrow. Prove to yourself that your silicone mixture makes every tiny sword look legendary.