


Making your own silicone dildo mold, sometimes called a penis mold, can be a rewarding experience because it allows you to customize the exact shape, size, and design. Besides, it can save you money in the long run and give you full control over the materials used.
By making it yourself, you can ensure that the toy is made from body-safe material. Using high-quality, non-toxic, skin-safe silicone helps ensure the final product is safe for skin contact and unlikely to cause allergic reactions.
In this guide, we will walk you through every step of the process. You will learn practical dildo molding techniques that make it easy to create a safe, durable, and high-quality DIY dildo mold.
Common Types of Dildo Molds
There are several common types of dildo molds used in DIY projects and professional manufacturing. The most common is a simple block mold, where silicone is poured around a prototype. More advanced designs include two-part molds and brush-on molds for complex shapes. Choosing the right mold type depends on the design, level of detail, and production needs.
Materials and Tools You Need
Before you start, get all your materials ready. Here’s what you need:
Good Silicone: Use medical-grade platinum-cure silicone such as Smooth-On Dragon Skin® or Topsil Platinum Silicone. Then check for FDA-compliance or ISO 10993 certification. There are different types of silicone, from soft to hard. The hardness of each type is indicated on the Shore hardness scale. We are making RTV (Room-Temperature Vulcanizing) silicone molds. Avoid tin-cure silicone for body toys as it’s not always safe.
Mold Release Spray: This prevents silicone from sticking. Use Mann 200 or Ease Release™ and apply it lightly. Some use petroleum jelly, but a proper mold-release spray is safer.
Shape Maker (Prototype): You need a shape to copy. Use sulfur-free clay like Monster Clay, which won’t interfere with curing.
Mold Box: Holds the silicone. A cup works, or build one with LEGO® blocks. Make it sturdy and leave space around the shape.
Safety Stuff: Wear nitrile gloves. Work in a ventilated area with fresh air.
Mixing Tools: Clean containers and sticks are needed. A scale helps measure Part A and B accurately by weight or volume.
Optional Helpers: Vacuum degassers or chambers remove air bubbles. A pressure pot system or heat gun can also help create a bubble-free dildo mold.
Table: Key Materials and Why
| Item | Why You Need It | Examples / Notes |
| Platinum Silicone | Body-safe, strong, lasts long | Dragon Skin, Mold Star, Topsil Silicone PR Series, ISO 10993 Certified |
| Mold Release | Stops sticking | Mann 200, Ease Release, use lightly |
| Prototype | The shape you want to copy | Sulfur-free clay, 3D print |
| Mold Box | Holds the liquid silicone | Cup, LEGO box, custom container |
| Safety Gear | Protects you | Nitrile gloves, good airflow |
Method 1: How to Make a Silicone Dildo Mold (Step-by-Step)
Let’s mold a dildo! Follow these steps carefully, go slow, and take your time.
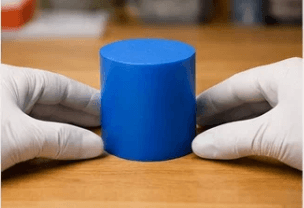
Step 1: Make Your Shape (Prototype)
First, create the shape you want to copy. Use clay and make it very smooth, with no bumps or lines. Pay attention to detail preservation, especially for tiny features. If your design needs a flat bottom to stand upright, make sure to shape it accordingly. Some people use rapid prototyping to make shapes faster.
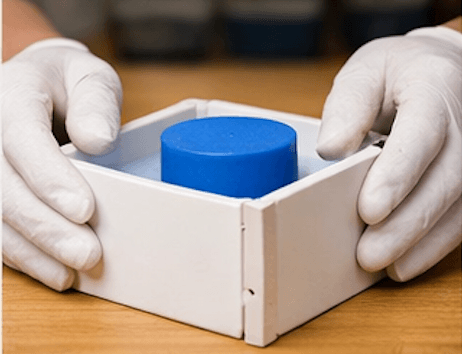
Step 2: Build the Mold Box
Place your prototype in a mold box or cup and stick it to the bottom using a little glue or sticky tack. Leave about half an inch (1–2 cm) of space around the shape for the silicone. If you plan a two-part mold, you’ll need mold registration keys—small bumps and dips that help the halves fit together later. For a simple block mold, one box is enough.
Step 3: Apply Mold Release Spray
Spray the inside of the box and the prototype lightly. Don’t overdo it—just enough to make the surfaces shiny. This prevents the silicone from sticking. Always use a non-toxic mold release spray for safety.
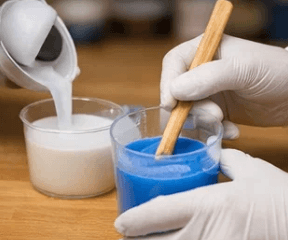
Step 4: Mix the Silicone
Follow the silicone manufacturer’s instructions carefully. Most silicones come in two parts, A and B, and you must mix them accurately. Measure by weight or volume with a scale, then stir slowly and thoroughly to avoid bubbles. If you want to add color, use skin-safe pigments like Silc Pig® or Smooth-On SoStrong®. You can also add glow-in-the-dark additives. Mix any additives well. Optional: silicone thinner or thixotropic agents can adjust flow for brush-on methods.
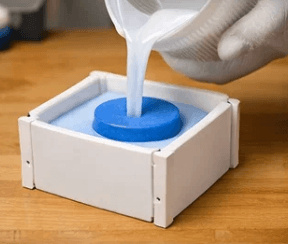
Step 5: Pour the Silicone
Pour the mixed silicone slowly into the mold box at one spot and let it flow naturally to cover the shape. Leave about half an inch (1 cm) of silicone above the highest point for strength. If you see bubbles, tap the box gently or use a vacuum degasser before pouring. Self-leveling silicone helps create a flat surface. Some molds may require venting channels.
Step 6: Let It Cure (Get Hard)
Let the silicone sit undisturbed until it hardens. Most room-temperature vulcanizing (RTV) silicones need around 24 hours. Temperature affects curing: warm rooms speed it up, cold rooms slow it down. Don’t rush the process. If the silicone stays sticky, check for cure inhibition caused by contamination, such as sulfur clay or latex-free materials.

Step 7: Demold (Take It Out)
Once cured, gently check a corner for firmness. Carefully remove the mold from the box, then slowly pull out the original shape. Take care not to tear the mold. Using a soft silicone like MoldStar15 makes demolding easier. For two-part molds, you may see seam lines.
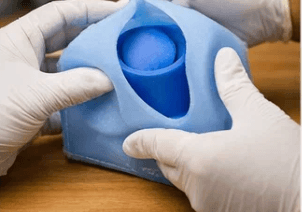
Step 8: Clean and Check Your Mold
Inspect the mold for bubbles or tears. Clean it gently. Now your silicone mold is ready for casting. You can make multiple silicone copies and explore advanced techniques like hollow casting, dual-density toys, insert molding, or rotocasting. Store molds hygienically in a clean, dry place and check silicone shelf life before starting future projects.
Table: Making Process Summary
| Step | Action | Key Point | Data Point |
| 1. Make Shape | Sculpt your design | Smooth surface, no undercuts | – |
| 2. Build Box | Contain the shape with space around it | Secure shape, leak-proof | – |
| 3. Apply Release | Lightly coat the box and shape | Prevents sticking | Like a non-stick pan coat |
| 4. Mix Silicone | Combine parts A and B exactly per instructions | Correct ratio, slow mix, avoid bubbles | – |
| 5. Pour Silicone | Pour slowly into the box over the shape | Let it flow, cover the top | Aim for ~400g silicone |
| 6. Cure | Let the silicone harden undisturbed | Patience, room temperature | 24 hours typical cure |
| 7. Demold | Carefully remove the box and the original shape | Gentle, avoid tearing | Soft silicone helps |
| 8. Inspect & Clean | Check the mold quality, clean it | Ready for casting | Mold lasts 50+ uses |
Method #2: 3D Printed Dildo Mold
Using a 3D printer to create your prototype is ideal for highly detailed or complex shapes. The printed model will serve as the master pattern for your silicone mold.
Materials:
PLA, ABS, or resin suitable for 3D printing
Sandpaper or polishing tools for smoothing
Optional: mold release spray
Steps:
Design your toy in 3D software, keeping in mind the final dimensions and textures.
Print the model using your preferred 3D printer and material.
Smooth out layer lines and imperfections with sandpaper or polishing tools.
Apply a thin coat of non-toxic mold release spray to prevent silicone from sticking.
Pros:
Extremely precise, ideal for fine details
Can be modified and reprinted easily
Durable for repeated mold-making
Cons:
Surface may require finishing
Certain materials may react with silicone if not properly treated
Best For:
Complex shapes, highly detailed molds, and repeatable prototypes
Method #3: Clone-A-Willy / Rapid Prototyping Kits
Rapid prototyping kits like Clone-A-Willy allow you to create a body-safe prototype quickly. This method is often used by beginners or for testing toy shapes before making a final silicone mold.
Materials:
Kit-provided body-safe silicone
Mold box or container
Optional: small tools for fine adjustments
Steps:
Follow the kit instructions to mix the silicone and pour it around your prototype or mold form.
Allow it to set according to the kit’s recommended curing time.
Remove the prototype and inspect for details.
Use this prototype as a reference for your final mold.
Pros:
Simple and quick to produce
Body-safe materials included
Excellent for shape testing
Cons:
A prototype is not durable for repeated casting
Limited flexibility for custom adjustments
Best For:
Quick testing of shapes, beginners, or pre-planning a final mold
FAQ about DIY Dildo Molds
Q: My silicone has bubbles! What do I do?
A: Mix slower next time . Pour slower . Pour from high up in a thin stream. Tap the mold gently. A vacuum chamber use or Vacuum Degasser is the best way to degas bubbles . A pressure pot also works great. A heat gun might pop surface bubbles but be careful not to overheat. Bubbled-Free Pouring Guides can help.
Q: My silicone is sticky! It didn’t get hard.
A: Did you mix Part A and Part B right? Check the mixing ratio guidance. Was the room too cold? Temperature effects on curing. Did something bad touch the silicone? This is silicone cure inhibition. Check troubleshooting incomplete curing guides from the maker. Maybe use silicone adhesion promoters only if needed for specific jobs, not usually for the mold itself.
Q: How many toys can I make with one mold?
A: Many! A good platinum silicone mold can last for 50 or more uses . If you are careful. This shows good longevity of silicone molds. Treat it well. Use mold release spray each time.
Q: Is making my own mold expensive?
A: The first time, maybe 50 to 50 to 50 to100 for the silicone and supplies . But you can make many toys from one mold. So it gets cheaper for each toy. Look for cost-effective silicone like ELASTOSIL® M 1470 for certain types of molds (check if body safe for the final toy if using it directly). Think about silicone waste reduction.
Q: Can I make different textures?
A: Yes! The mold will copy the texture of your shape. Make your shape smooth or bumpy. You can make realistic toy textures. Good surface texture replication depends on your prototype and silicone quality. High-detail silicone picks up everything. Some people frost silicone surfaces for a different feel.
Q: Can I make it glow or have colors?
A: Yes! Add skin-safe pigments like Silc Pig® when mixing . Or glow-in-the-dark additives. Make sure they are safe for skin contact. Pigmenting silicone is easy. Translucent silicone uses are possible too.
Wrapping Up
Making your own silicone dildo mold lets you be creative. You can design your perfect shape. It takes time and care. But it can be rewarding.
Remember the key things:
- Safety first! Use body-safe platinum-cure silicone.
- Follow the steps carefully. Especially mixing.
- Be patient with the curing time.
- Keep everything clean.
Think about silicone shrinkage (most good silicones shrink very little). Consider undercut prevention in your design for easier demolding. You might need post-processing finishing, like sanding silicone edges carefully. You can explore silicone density options or layered casting for different feels. Some toys need a good suction cup integration.
Have fun making your own special things! From reproduction molding to totally new ideas, you are the designer. Enjoy the homemade dildo mold!