
Your Easy Step-by-Step Guide
Have you ever wanted to make a copy of a hand, a face, or another body part? Maybe for art, for special effects (SFX) makeup molds, or just for fun? Using silicone rubber is a great way to do this! This process is called lifecasting . It lets you capture amazing detail, like fingerprints or skin texture. This guide will show you how to make a silicone mold of a body part, step by step. We will keep it simple, like talking to a friend.
Why Use Silicone? It’s Awesome!
Why pick silicone for body casting techniques?
- Super Detailed: Silicone picks up tiny details, like skin pores or fine hairs/details. It makes high-precision molds.
- Strong and Bendy: Silicone molds are flexible and durable. You can use them many times to make copies . This makes them reusable silicone molds.
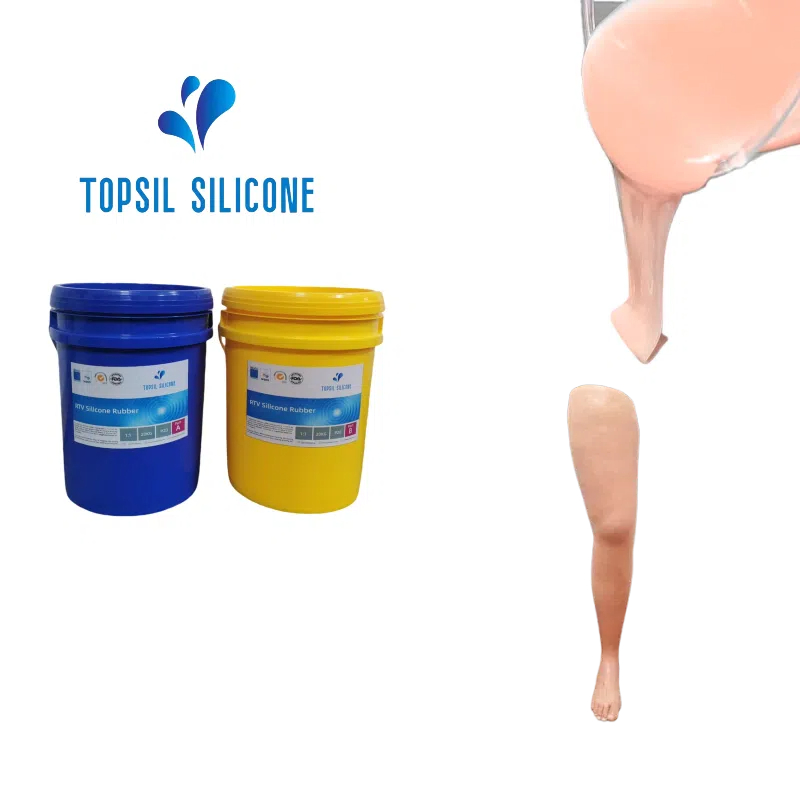
- Safe for Skin: Many silicones are body-safe molding materials. Always choose skin-safe silicone rubber, sometimes called medical-grade silicone or non-toxic silicone . Brands like Smooth-On make popular ones like Body Double™ and Dragon Skin® .
- Works with Many Materials: You can pour things like plaster, resin, or even chocolate (if using food-grade silicone) into your finished silicone mold. This allows casting plaster/resin in molds. Check out how silicone is used for silicone for resin mold making.
Sometimes people use alginate (like dental alginate) first. Alginate impression molds are fast but usually only good for one or two copies . Alja-Safe is a popular fast-set alginate. Silicone molds last much longer . You might also hear about latex vs. silicone for molds, but silicone is often preferred for direct skin contact and detail. For complex projects, even 3D-printed mold prototypes might be used in planning.
Stuff You Will Need: Your Body Casting Kit
Before you start your silicone mold-making tutorial, let’s gather your supplies. Think of it like getting ingredients for baking!
Must-Have Materials:
- Skin-Safe Silicone Rubber: This is key! Look for platinum-cure silicone like Mold Star® or Body Double™. Tin-cure silicone exists but is less common for skin. Check the silicone hardness (Shore scale) – softer is often better for body parts. Platsil Gel 10 is used for prosthetics fabrication. You can find two-part silicone kits from brands like Smooth-On, Polytek®, or BJB Enterprises. Silicones Inc. and Silicone Engineering (a UK brand) also make these. Check suppliers like Reynolds Advanced Materials, Mouldlife (UK), or The Compleat Sculptor in NYC. Even Walmart Craft Section might have basic kits.
- Mold Release Agent: This stops the silicone from sticking to skin or hair. Petroleum jelly (like Vaseline®) or special mold release agents work well. Some use Johnson’s Baby Powder.
- Mother Mold Material: Silicone is floppy! You need a hard shell around it called a mother mold or support shell. Plaster bandages (like doctors use for casts) are easy and common 1. You can also use fiberglass or special plastics.
- Mixing Stuff: Cups, sticks, maybe a scale to measure. Follow the mixing ratios for silicone exactly!
- Gloves: Protect your hands. Latex gloves are okay, but nitrile is better if you have allergies.
Optional Tools (But Helpful!):
- Silicone Thickeners: Like Thi-Vex® from Smooth-On. This makes the silicone less runny, good for vertical parts . It helps build up mold thickness. You can also use pre-thickened silicone.
- Vacuum Chamber: For degassing silicone. This removes air bubbles for a perfect mold. A pressure pot can also work for pressure casting methods.
- Brushes & Tools: For applying silicone precisely. Maybe syringe kits for tiny details.
- Mold Box / Containment Area: To keep the silicone from spreading everywhere. You can build a simple frame.
- Modeling Clay: To plug holes or build temporary walls.
- Sealant: Like Krylon® spray, to seal porous surfaces if molding an object, not skin.
Step 1: Get the Body Part Ready!
Preparation is super important for creating negative molds of body parts.
- Clean Up: Wash the body part (like a hand or foot) well. Skin oils can mess up the silicone (skin oil contamination prevention).
- Hair Today, Gone Tomorrow? Lots of hair can get stuck. You might want to shave the area or use a lot of release agent. The goal is capturing fine hairs/details without pain!
- Apply Release Agent: Gently rub Vaseline® or your chosen mold release agent all over the area. Get it into creases and around nails. Don’t miss spots! This helps with demolding techniques later.
- Get Comfy: The person being molded (the model) needs to stay still! Make sure they are in a comfortable pose they can hold. This is key for model preparation for casting. Safety protocols for models are vital – ensure they are warm, comfortable, and can breathe easily, especially for face molds (molding hands/feet/face). Consider ethical considerations in lifecasting.
Step 2: Mix and Put on the Silicone
This is the fun part – applying the silicone!
- Read the Instructions: Every silicone kit is different. Read the mixing ratios (usually 1:1 by weight or volume) and pot life (how long you have to work before it starts setting). Things like ambient temperature effects and humidity impact on curing can change times.
- Mix It Up: Measure Part A and Part B accurately . Use clean cups and sticks. Mix thoroughly but try not to whip in too many air bubbles. Scrape the sides and bottom of the cup.
- Thicken if Needed: If molding an upright area, mix in a thickener like Thi-Vex . This helps the silicone stay put and build up mold thickness. You want about a 3/8 inch (1 cm) mold wall thickness .
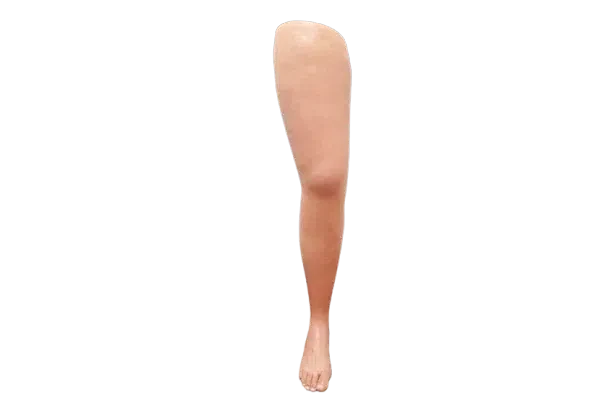
- Apply the First Layer (Detail Coat): Gently brush or pour a thin layer of silicone onto the skin. Get it into every nook and cranny. This captures the realistic skin texture replication. This is a key part of artisan silicone mold techniques.
- Build Up Layers: Let the first layer get a little firm (tacky). Then add more silicone using a layered pouring technique or brush-on mold methods. Keep adding layers until it’s thick enough (usually 1/4 to 1/2 inch). Ensure even distribution . Slowly pour the silicone mixture to avoid trapping air . Think about mold venting for air escape.
- Check for Undercuts: These are tricky areas where the mold might lock on. Fill them carefully . This is important for prosthetics fabrication and avoiding mold tearing.
Pro Tip: Have a friend help! Especially for your first time. Silicone can have a short work time, and extra hands make it smoother . Some silicones have accelerators for faster curing or inhibitors for slower curing, but stick to the basics first.
Step 3: Make the Mother Mold (The Hard Shell)
Your silicone layer is like a floppy glove. It needs backup! This is the mother mold or support shell.
- Let Silicone Cure Slightly: Wait until the silicone is firm but maybe still a little sticky (check instructions for curing time for silicone – Body Double rubber takes about 5 minutes to set enough for this step 6).
- Apply Plaster Bandages: Dip strips of plaster bandage in warm water. Squeeze out excess water. Lay them over the silicone, overlapping the strips. Cover the entire silicone area. Build up 3-4 layers. Make sure it’s strong! 1
- Think About Removal: How will you get the body part out? Sometimes the mother mold is made in two halves, separated by clay or a flange. Add mold registration keys (like little bumps and dents) so the halves fit back together perfectly. This is vital for multi-part mold assemblies.
- Let it Harden: Plaster gets warm as it cures, then cools. Wait until it’s hard and cool (usually 20-30 minutes).
Some pros use other underlying support structures or materials like fiberglass, but plaster bandages are great for beginners learning how to make a silicone mold of a body part.
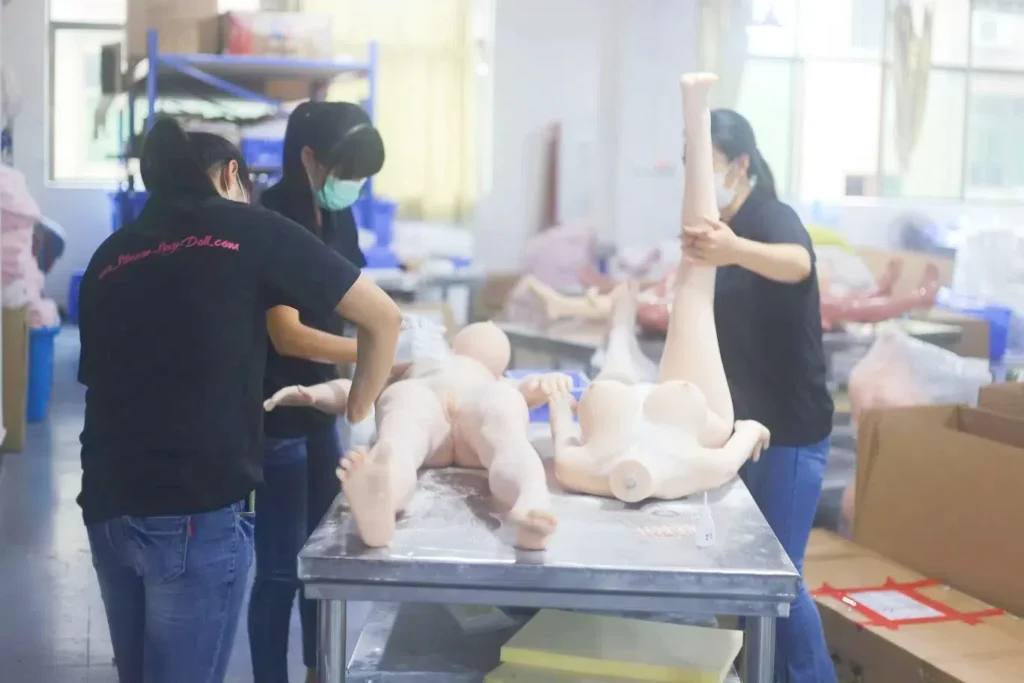
Step 4: Take it Off! (Demolding)
The moment of truth! Time for demolding techniques.
- Gently Wiggle: Once the plaster mother mold is hard, carefully wiggle the body part (like your hand) inside the silicone.
- Remove the Mother Mold: If you made it in two halves, gently pry them apart. If it’s one piece, you might need to carefully slide it off.
- Peel Off the Silicone: Slowly peel the flexible mold material (silicone) away from the body part. Go slow to avoid mold tearing. Sometimes adding a little water or release agent helps.
- Put it Back Together: Place the silicone mold back inside its plaster mother mold shell. Now you have a negative mold ready for casting!
Troubleshooting:
- Mold Tearing? You might be able to fix torn silicone molds with more silicone (like Sil-Poxy adhesive).
- Stuck? You might need more release agent next time, or a different body position.
- Warping? Ensure the mother mold provides good support to prevent silicone mold warping. Proper silicone mold storage helps too.
Step 5: Casting Your Copy
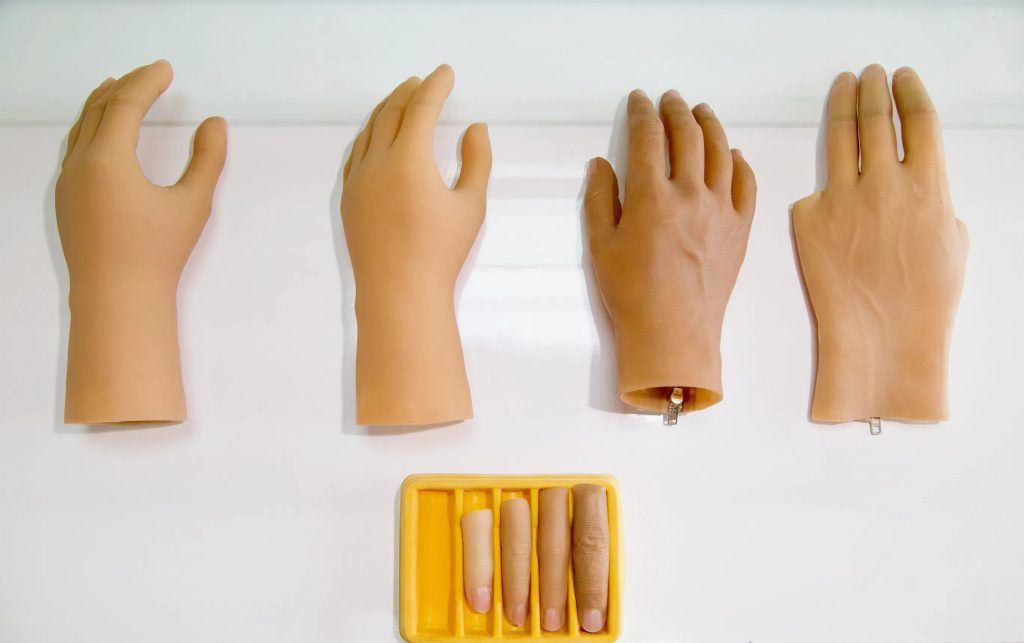
You did it! You have a silicone mold. Now you can make copies.
- Choose Your Casting Material: What do you want your copy made of? Plaster? Resin? Wax? Concrete? Make sure your silicone is compatible (compatibility with casting materials). You might want silicone for concrete & stone molding or even silicone for rapid prototyping casting.
- Prepare the Mold: Make sure the mold is clean and dry. You might need a release agent inside the silicone mold depending on your casting material.
- Mix and Pour: Mix your casting material according to its instructions. Slowly pour it into the silicone mold. Tap or vibrate the mold gently to release air bubbles.
- Let it Cure: Wait for the casting material to fully harden (demold time).
- Reveal Your Copy! Carefully remove the mother mold, then peel away the silicone mold to reveal your finished piece! You might need some post-processing like sanding seam lines.
You can often get many casts from one durable silicone mold . Hollywood favorites like HongYeJie silicone are industry standards because they last .
Safety First! Important Tips
Playing with chemicals needs care. Follow these safety precautions for skin contact:
- Use Skin-Safe Silicone ONLY: Double-check your silicone label. It MUST say “skin-safe,” “lifecasting,” or similar. Brands like Body Double™ or Feroca’s Body Silk-Cast are designed for this . Look for ISO 10993 compliance for biocompatibility. AMA Laboratories might certify some products.
- Do a Patch Test: Test a tiny amount of silicone on a small skin area first to check for reactions 3.
- Good Air Flow: Work in a well-ventilated area.
- Protect Eyes and Clothes: Wear safety glasses and old clothes.
- Never Mold Alone: Especially when molding hands/feet/face. Have someone there to help if needed 1.
- Face Molds Need EXTRA Care: Never cover both nostrils! Leave breathing holes clear. Use straws if needed. This is critical for making a mold of a human face .
- Keep Away From Kids: These materials are for adult use or supervised Jmmico Children’s DIY Zone activities .
Troubleshooting & Extra Tips
- Bubbles: Removing air bubbles is tricky. Degassing silicone with a vacuum chamber is best. If not, mix slowly and pour high in a thin stream. A pressure pot for bubbles during casting also helps.
- Not Curing: Check your mixing ratios for silicone and temperature. Old silicone might not cure (mold shelf life). Some materials inhibit platinum silicone (like latex gloves, sulfur clay). This is silicone catalyst chemistry!
- Texture Issues: Ensure the skin was clean and the first layer captured all surface detailing. Realistic skin texture replication needs care.
- Cost: Lifecasting can be pricey. Look for budget-friendly silicone options or cost-effective body casting kits to start. Maybe try Alja-Safe® first for a temporary mold .
- Storing Molds: Keep finished molds clean, dry, and supported by their mother mold to prevent warping. Check the mold shelf life.
Cool Things People Make! (Applications)
What can you do with these molds?
- Special Effects (SFX): Create realistic wounds, scars, or monster parts for movies or Halloween! Think Stan Winston Studio or artists like François Dagenais, Tom Savini, or Rick Baker. Schools like The Stan Winston School or events like IMATS showcase this. Monster Makers and Burman Industries sell SFX supplies.
- Prosthetics: Make custom-fit parts for prosthetic fitting adjustments or DIY prosthetic limbs. Medical-grade silicone is often used here. Research happens at places like Johns Hopkins APL. Companies like Cincinnati Prosthetics or studios like Prosthetic Renaissance (founded by Michael DeVries) specialize in this.
- Art: Create anatomical sculptures, lifecasting art, or unique pieces. Artists like Bob Bassett do lifecasting. Check out Sculpture House for supplies. Collaborative art casting can be fun.
- History & Science: Museums like The International Museum of Surgical Science or The Smithsonian might use molds for displays. Moulage techniques (historic) were used for medical models.
- Just for Fun: Make copies of baby feet, couple’s hands, or even use food-grade silicone for chocolate molds (ensure safety!).
Frequently Asked Questions (FAQs)
- Alginate vs. Silicone: What’s the difference?
- Alginate (like Alja-Safe® or Silly Crazy®) is fast, cheap, captures detail well, but molds are temporary (good for 1-2 casts) and tear easily .
- Silicone (like Body Double™ or Platsil Gel 10) is more expensive, takes longer to cure, but molds are very durable, flexible, and reusable many times .
- Can I mold my whole body?
- Yes, but it’s complex! You need help, lots of material, and careful planning for a silicone suit . It’s often done in sections.
- How do I get really smooth results?
- Use a good quality silicone, degas it if possible, and apply thin layers carefully . Consider post-processing silicone surfaces.
- What about copyright?
- Be mindful of copyright for body molds, especially if casting someone else or for commercial use.
You Can Do It!
Making a silicone mold of a body part seems tricky, but by following these steps, using the right body-safe molding materials, and taking safety seriously, you can create amazing, detailed copies. From Hollywood favorites to home crafters, lifecasting opens up a world of creativity. Gather your Smooth-On kit, grab a friend, and give it a try!
Remember key things like using a mold release agent, building a strong mother mold and choosing the right silicone hardness (Shore scale). With practice, you’ll master body casting techniques and be making incredible lifecasting projects in no time. Happy molding!