

How to Make a Two-Part Silicone Mold
It’s critical to get the mold right if you desire your casted 3D products to be perfect.
3D items like figurines, mechanical items, or decorative minis can be rather made complex. Therefore, you need more than just an easy open-face mold and mildew. That’s where a two-part mold comes in handy.
This overview will certainly review just how you can build a two-part silicone mold and mildew from the beginning till completion. The technique deals with different materials, including material, resin, wax, soap, and low-temperature metal. Highlight? It gives you accuracy, repeatability, and resilient outcomes.
Let’s get started!
How to Make a Two-Part Silicone Mold
What is a 2-Part Silicone Mold and Why Use One?
Materials and Tools You Will Need
Technical Parameters To Look Out For:
Step 1: Preparing Your Model and Building the Parting Line
Step 2: Creating Registration Keys
Step 4: Pouring the First Half of the Mold
Step 5: Demolding and Prepping for the Second Pour
Step 6: Pouring the Second Half
Step 7: Demolding the Finished Two-Part Silicone Mold
What is a Two-Part Silicone Mold and Why Use One?
You can’t shape something from just one side if it has details on all sides. That’s when you need a 2-part silicone mold. It lets you make a full 3D copy without hurting the original or losing any small features.
Each section shows one side of your model. They make up a whole cavity. This makes it perfect for any model that is either symmetrical or circular. These would otherwise trap air or be hard to get out.
Consequently, if you intend to get specialist results, you require to know how to make a 2 part mold.
Materials and Tools You Will Need
Prior to diving into the actions, gather your essentials. It saves time and reduces the risk of rushing a critical moment.
You will need:
- Your original model (non-porous and sealed if necessary)
- Modeling clay (non-sulfur based, preferably plasticine)
- Silicone rubber (platinum or tin cure depending on your preference)
- Mold box materials (Lego, foam core, acrylic sheets, or plastic containers)
- Hot glue gun or tape
- Mold release agent
- Mixing cups and stir sticks
- Weighing scale
- Craft knife or scalpel
- Registration key tool or a rounded sculpting instrument
- Ruler or calipers
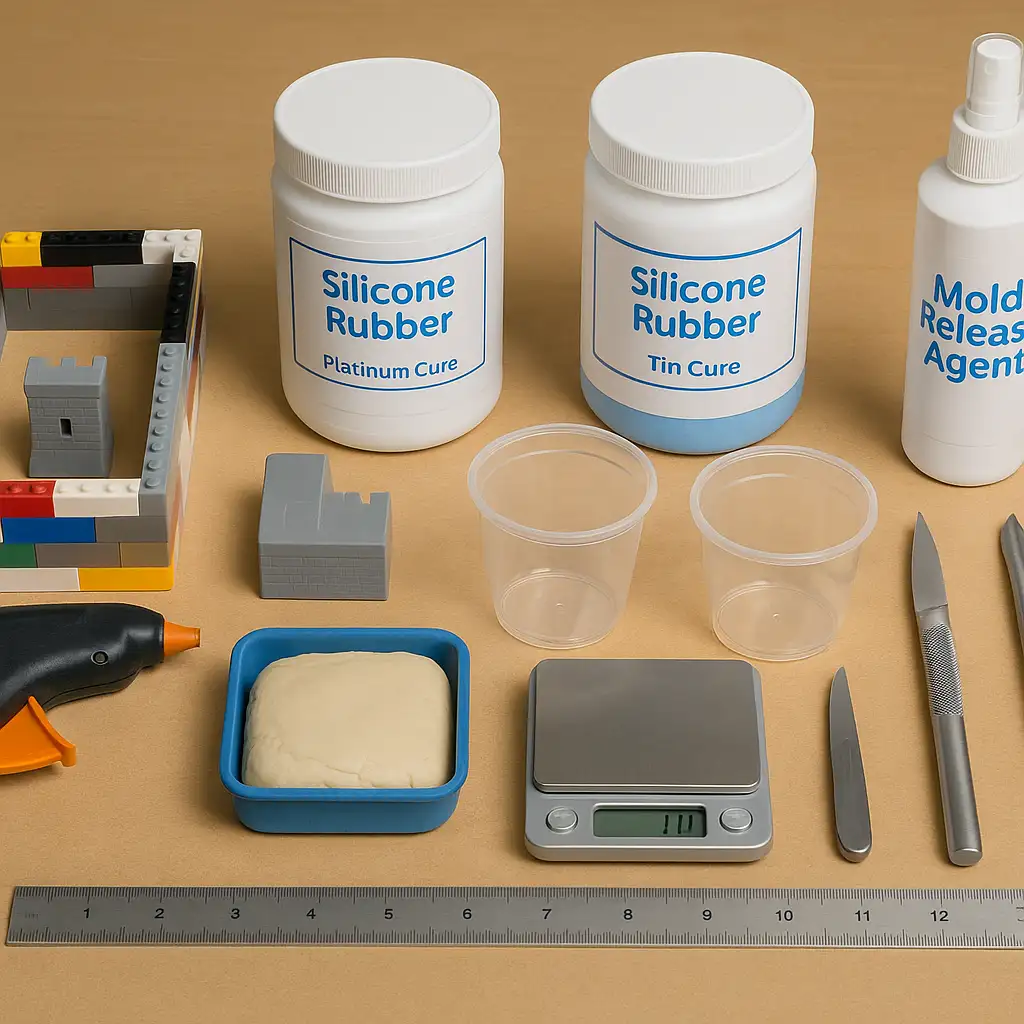
Alt Text: Top-down view of materials and tools for making a two-part silicone mold
Technical Parameters To Look Out For:
- Viscosity (mPa·s): Lower viscosity (under 20,000 mPa·s) flows more easily into fine details and traps fewer bubbles; higher viscosity offers more control for larger molds but can increase bubble risk without degassing.
- Shore Hardness: Softer silicone (Shore A 10–20) is flexible and easier to demold delicate parts; harder silicone (Shore A 30+) is more durable for repeated casting but can make demolding trickier.
- Tear Strength (kN/m): Higher tear strength (≥20 kN/m) improves mold durability and reduces the risk of rips during demolding; lower tear strength may be cheaper but shortens mold lifespan.
Want more background on your silicone mold making options? Check our Ultimate Guide.
Step 1: Preparing Your Model and Building the Parting Line
The parting line is where your mold splits into two. Planning this is the foundation of how to make a two part silicone mold correctly.
Set your object on a flat, clean surface. Push it halfway into a bed of clay; only the top half should be visible. The clay should tightly hug the object’s surface, with no visible gaps. This creates a perfect barrier that defines one half of the mold.
Smooth out the clay to ensure your parting line is neat. Jagged lines will show up in your mold and castings.
Now, clean up the edges and trim excess clay from the mold area.
Step 2: Creating Registration Keys
Registration keys help your two mold halves align perfectly every time.
This step is where detail matters. Use a rounded sculpting tool to press shallow, evenly spaced indents into the clay surrounding your object. Think of them like puzzle locks—they prevent slippage between mold halves during casting.
Avoid placing keys too close to the object. That can cause issues when demolding.
Learning how to make a 2 part silicone mold is not just about technique; it is about control. These keys are part of that precision.
Step 3: Building the Mold Box
Time to contain the whole operation.
Build a mold box around the clay base and your model. Make sure it is at least half an inch larger than your object on all sides, including height.
You can use:
- Foam core panels
- Acrylic sheets
- Plastic food containers
- LEGO bricks (great for modular shapes)
Seal the edges with hot glue or tape to prevent leaks. Press everything down firmly against your work surface.
Once your box is sturdy and leakproof, double-check the clay barrier is undisturbed. Even slight shifts can affect the final mold geometry.
This framework is your mold’s backbone. You cannot learn how to make a two part mold without understanding the importance of a strong box.

Alt Text: Close-up of blue-gloved hands pouring light blue silicone rubber into a LEGO brick mold box with a small gray 3D-printed castle inside, demonstrating how to make a two part silicone mold on a sealed wooden surface.
Step 4: Pouring the First Half of the Mold
Here comes the chemistry.
Mix your silicone rubber according to the manufacturer’s ratio. Use a scale to ensure accuracy. Stir thoroughly; then transfer to a second cup and mix again. This reduces the chance of unmixed portions affecting the cure.
Pour slowly into one corner of the mold box. Let the silicone rise and flow naturally over the object. This helps minimize air bubbles.
Let the silicone cure completely. Depending on your material, this may take 4 to 24 hours. Once cured, you are halfway through the process of how to make a two part silicone mold.
Step 5: Demolding and Prepping for the Second Pour
When the silicone is solid, gently remove the clay. Your object should stay embedded in the cured silicone.
Clean off any clay residue. If you damage the registration keys, reshape them with a sculpting tool.
Now spray the exposed silicone with a mold release agent. This is critical. Without release, the second half will fuse with the first, and ruin your mold. We recommend a high-quality option from our Best Release Agents list.
If you skip this step, you are not learning how to make a two halves silicone mold properly.
Step 6: Pouring the Second Half
Rebuild the mold box if needed. It should still fully enclose your object.
Mix and pour your second batch of silicone just like the first. Pour slowly and steadily. Let it rise to cover the object completely. Again, patience prevents trapped air and surface bubbles.
Let it cure fully. Do not rush this stage. Curing time is not negotiable when learning how to make a two part silicone mold with precision.
Step 7: Demolding the Finished Two-Part Silicone Mold
Once both halves are fully cured, carefully separate them.
You will see the clean seam where the two parts meet, guided by your parting line. If the release agent worked, they should peel apart smoothly.
Remove your original model. Examine the cavity for trapped air bubbles or surface flaws. If it looks good, congratulations! You now have a fully functional two-part silicone mold.
This is the final test in learning how to make a two part silicone mold. Everything before this moment was about setup; now comes execution.
Bonus Tips for Better Results
This section can save you from beginner mistakes. Remember these while refining your skills.
- Use a vacuum chamber or pressure pot if you are consistently getting bubbles. Not essential, but a game-changer.
- Always check your clay is sulfur-free. Sulfur inhibits curing in platinum-cure silicone.
- Mark the sides of your mold halves with “A” and “B” for faster assembly.
- Trim flashing with a craft knife after casting. It is normal, not a failure.
If you get a rough edge or the halves do not align, revisit your registration keys or parting line clay work. Those are usually the culprits.
Watch the Process in Action
Prefer a visual walkthrough? This video tutorial on YouTube shows every stage of how to make a two part silicone mold clearly. Follow along to reinforce the process.
Video tutorials are a great complement to written instructions; sometimes, a second angle helps a step click.
Why This Process Matters
Understanding how to make a two part silicone mold gives you control over your creative process.
You are no longer limited to premade molds or basic shapes. Whether you are crafting game pieces, miniatures, or functional parts, you are free to reproduce what you want, how you want.
Two-part molds are the gold standard for professional-level casting. They require more effort but deliver cleaner, repeatable results. And with the right materials and method, you can reuse them dozens of times.
The Learning Never Stops
Now that you know how to make a two part silicone mold, what will you cast first? A figurine? A gear? A custom piece for a cosplay prop? The possibilities are wide open.
And if you ever feel stuck, just remember this, every perfect cast starts with a clean mold.
Your mold is only as good as your method.
Do you want to know how to the Best Silicone for Miniature Molds: Beginner’s Guide ,
More help or question pls contact our whatsapp: +86 19129352728
or email: [email protected]