
Быстрый ответ
To mix and dispense 1:1 silicone gel for HEPA filters, confirm whether the ratio is by weight or volume, measure Part A and Part B accurately, and mix thoroughly. Fill the prepared gel channel within the material’s working window, checking corners, joints and the path closure. Verify cure on the actual frame before assembly. For automatic dispensing, also check the A delivery ratio, mixing quality and output after production pauses.
This guide covers two-component silicone gel for perimeter gel-seal channels. For sealing-system design, see our HEPA and ULPA filter silicone gel guide.
Confirm the Ratio and Prepare the Trial
Obtain the current technical data sheet and processing instructions. Confirm whether 1:1 means equal weight or equal volume, together with the permitted ratio tolerance and processing conditions. Ask for clarification if the basis is missing.
For 1:1 by weight, a 500 g batch contains 250 g of A and 250 g of B. A volume-based ratio may require different weights.
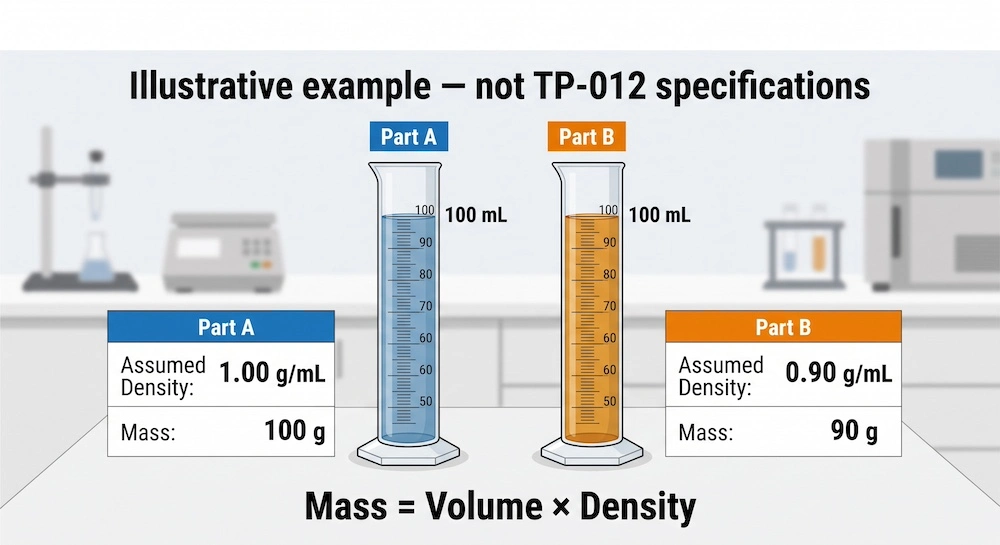
Example: checking a volume ratio by weighing
Assume a hypothetical material requires 1:1 by volume:
| Component | Assumed density | Target volume | Corresponding mass |
| A | 1.00 g/mL | 100 mL | 100 g |
| B | 0.90 g/mL | 100 mL | 90 g |
These unequal masses represent equal volumes. The calculation is mass = volume × density. This example explains the method; it is not TP-012 product data. Use each component’s actual density at the relevant temperature. WACKER’s RTV processing reference explains conversion between weight and volume ratios.
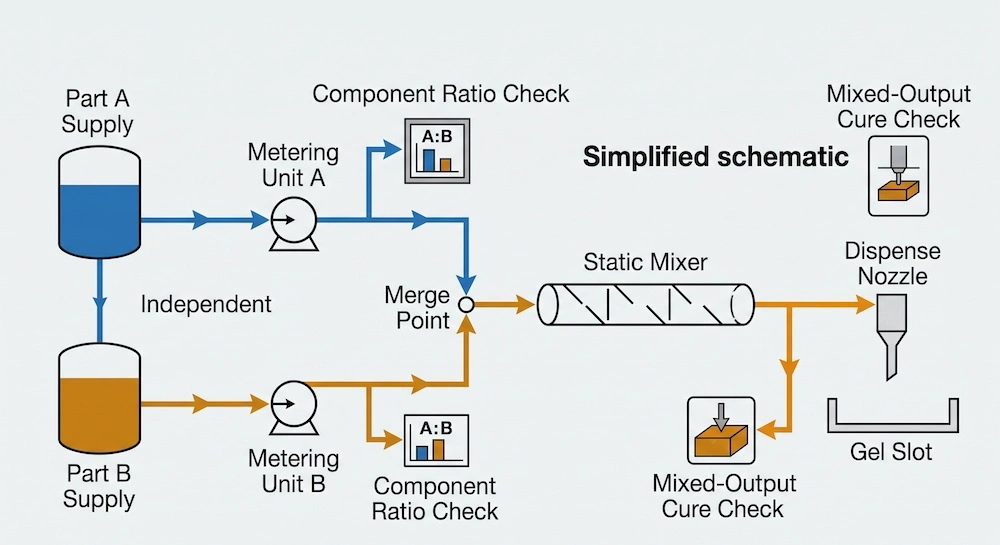
Before the trial, record material temperature, frame finish and target fill height. Prepare clean, dry tools and channels, and review the SDS. Keep component tools separate to prevent contamination.
If the material is still undecided, start with selecting silicone gel for HEPA and ULPA filter sealing.
Mix a Small Batch by Hand
Choose a batch your operator can mix and dispense within the supplier’s working window under the trial conditions. Mixing, transfer and any air-removal step all consume that time.
- Prepare and measure. Condition both components as instructed. Premix them individually if required. For a weight-based ratio, tare the cup and measure each addition with a suitable calibrated balance.
- Start timing. Record when A and B first contact each other.
- Mix the entire batch. Stir slowly while repeatedly scraping the cup wall and bottom. Avoid whipping air into the material. Record the mixing method, duration and batch size so the trial can be repeated.
- Keep comparison samples. Place some mixed gel in a clean control cup and some against a representative prepared frame surface. Label both with the batch and mixing time.
Color uniformity can help identify poor mixing in a colored system, but it does not prove acceptable cure. Evaluate the retained samples at the supplier’s specified cure checkpoint.
If the material thickens beyond usable dispensing consistency, stop filling. Adding fresh gel does not reset the working time of the existing mixture. Do not change the A ratio to accelerate curing.
Verify an Automatic Meter-Mix System
A 1:1 machine setting needs two separate checks: correct component delivery and adequate mixing.
Use the equipment manufacturer’s ratio-check arrangement and sampling procedure to measure A and B separately over the same interval. Compare the outputs on the specified weight or volume basis. Use the component densities when conversion is needed.
Weighing a combined shot checks total output; it cannot establish the A ratio.
Next, trial the proposed mixer at normal production flow and the lowest flow you expect to use. Retain outlet samples and compare their cured condition. Record the mixer model, flow setting and material temperature.
Mixer dimensions, material viscosity and required flow affect selection, as discussed in Nordson EFD’s static mixer guide. A generic element count is not a substitute for testing your material and equipment together.
When output or cure varies, check metering and mixing separately before adjusting several settings at once. Follow equipment instructions for pressure release, priming and mixer changes. Test restart behavior using Section 5 before approving the process for routine use.
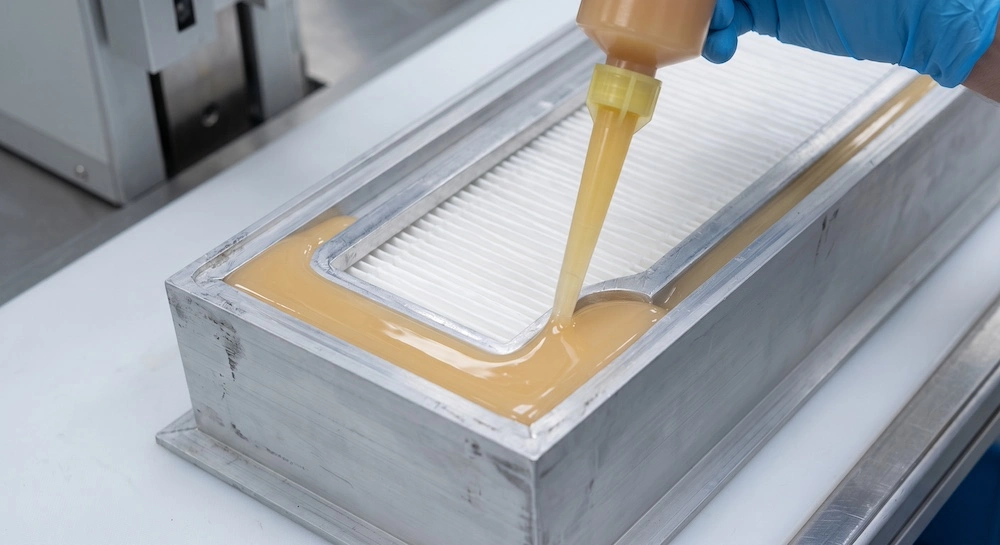
Fill the HEPA Gel Channel and Inspect Critical Locations
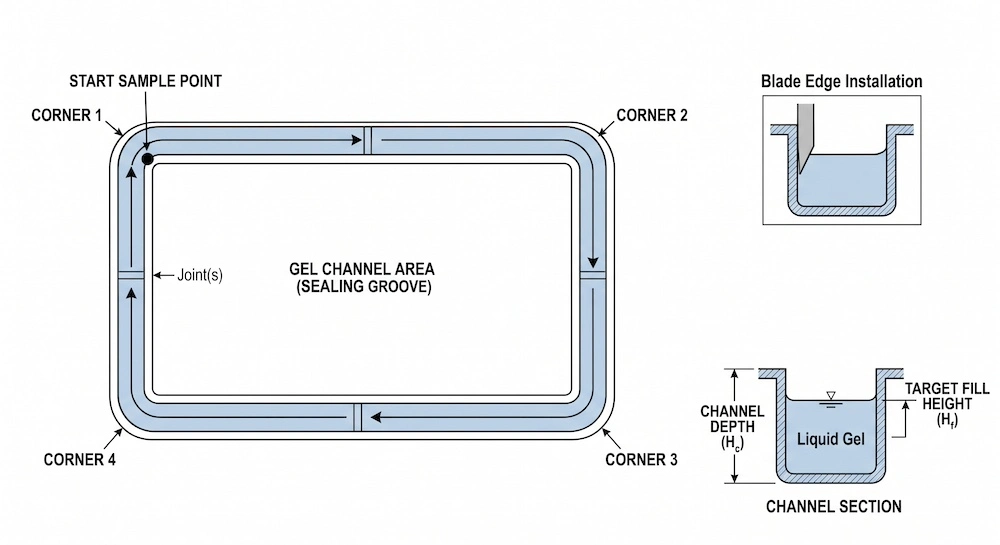
For a trial frame, sketch the channel and mark the intended start point, direction and finish point. Mark every corner and joint for inspection. Keep the frame level during filling and cure.
Use this sequence:
- Set the target fill height. Use the filter design requirement, accounting for knife-edge insertion and gel displacement. Channel depth does not automatically equal fill depth.
- Follow a repeatable path. Maintain controlled delivery and minimize unnecessary free fall from the nozzle. Record changes in travel speed or delivery at corners.
- Inspect the closure. Where the path returns to the starting area, check for a gap, trapped air or local overfill. Avoid assuming that visually overlapping material forms an acceptable seal.
- Check the perimeter. Compare fill height along straight sections, at corners, at joints and at the closure. Photograph any repeated defect at the same marked location.
Weigh the same frame before and after filling to check net deposited mass, accounting for spills or other changes. A correct total mass can still hide an underfilled corner and an overfilled straight section. Use weight and local inspection together.
When to add an air-removal step
If bubbles remain, investigate mixing, material delivery and the filling path. Whether vacuum degassing is needed depends on the grade and process.
For a new process, compare trial results using the supplier’s recommended air-removal method. Record treatment conditions, leave container headspace for vacuum expansion, and include treatment time in the working window. Do not adopt another product’s vacuum settings or assume low viscosity guarantees bubble-free filling.
Test Pauses and Restarts Before Routine Production
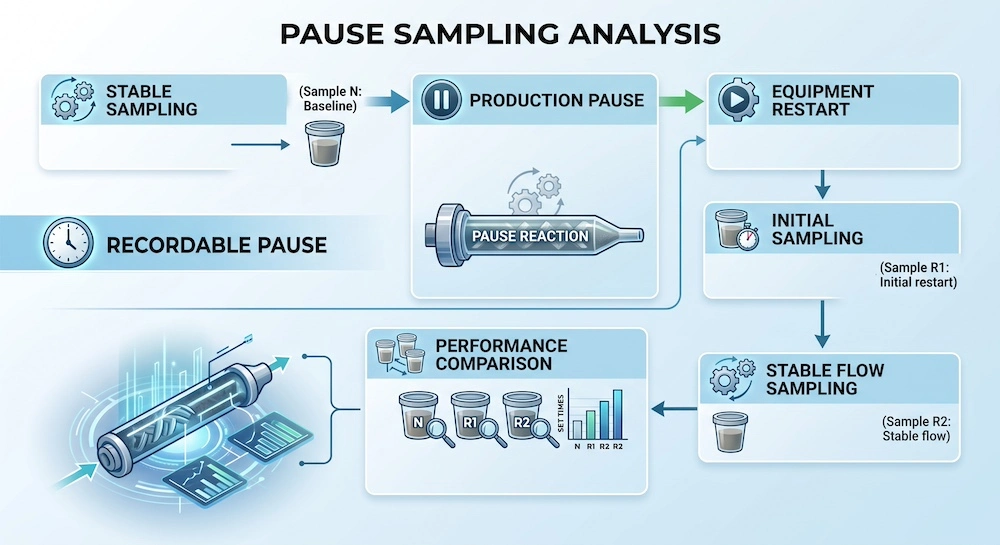
Mixed gel continues reacting inside a mixer during a pause. A TDS working-time value does not establish how long your equipment can remain idle with mixed material inside it.
A practical qualification trial is:
- Collect a baseline sample during stable production flow and record its dispensing conditions.
- Introduce a planned pause representative of the intended process, within supplier and equipment limits. Record its duration.
- Restart using the equipment procedure, including any required mixer replacement or priming. Collect and label initial and stable-flow output separately; keep trial material out of saleable filters until evaluated.
- Compare samples after equivalent cure conditions. Check output consistency, cure uniformity and filling behavior on trial frames.
- Repeat relevant pause conditions, then document the permitted pause range, restart actions and first-piece checks supported by the results.
If restricted flow appears, investigate the mixer and delivery system. Raising pressure alone does not show that the retained material is still suitable.
Once the process is qualified, routine restarts follow its control plan. They do not automatically require repeating the entire qualification trial above.
Check Fill Quality and Cure Before Assembly
Define when the frame can be moved without disturbing the gel and when final seal behavior can be evaluated. These may be different times. Use the grade-specific cure schedule and record the actual temperature.
Softness or surface tack alone cannot establish incomplete cure: these may be intended gel characteristics. Compare the agreed cured properties and inspect for liquid pockets or abnormal variation at the specified checkpoint.
Use the retained samples and defect location to choose the next investigation:
| Observation | Next check |
| Control cup also cures abnormally | Recheck measured ratio, mixing, material condition and temperature using clean tools. |
| Control cup cures, but frame-contact gel remains liquid | Test the coating, corner adhesive and cleaning residues separately for compatibility. |
| Voids recur at one corner or at the path closure | Compare delivery and nozzle movement at that marked location. |
| Normal-flow output passes, but restart output differs | Review pause history, mixer condition and restart actions. |
These comparisons identify likely investigation paths, not proven causes.
For a new material or process, complete qualification on the intended filter/housing assembly using its specified test method and acceptance limits. Routine production inspections and finished-product release then follow the established quality plan. A successful cup test cannot demonstrate an assembled filter’s leak performance.
Copy This Trial Record Before You Start
Use one record per trial condition. This is a blank working template, not a report of TP-012 performance.
| Record field | Your entry |
| Trial ID, date, gel grade and A/B lot numbers | — |
| Frame finish, channel dimensions and target fill height | — |
| Ratio basis, measured A/B amounts and component densities if used | — |
| Room/material temperature; mixing start and filling finish times | — |
| Manual method or machine, mixer model and flow settings | — |
| Filling path, corner/closure observations and net mass per filter | — |
| Pause duration, restart actions and sample labels | — |
| Cure conditions, inspection results and assembly-test results | — |
Track setup and purge waste separately from gel deposited in filters. Change one variable at a time so the next trial provides a useful comparison.
Plan a TP-012 Trial with Topsil Silicone
Review TP-012 silicone gel for air filter sealing and request its current TDS and mixing instructions before setting up a trial.
For a new project, send your mixing method, a channel photo or drawing, and your target production cycle. These details help frame the discussion about material suitability and trial setup.
For an existing problem, send your mixing method, actual temperature and elapsed cure time, plus photos of the affected area. Include control-cup results if available.
RECOMMENDED NEXT STEP
You can start with either set of information; a complete engineering package is not required for an initial discussion.
Request TP-012 Mixing Guidance