Быстрый ответ
Cure inhibition in platinum silicone is usually caused by surface contamination or incompatible materials touching the silicone during cure. Common risk sources include sulfur-containing clay, latex, certain paints or coatings, uncured resin residue, and poorly prepared 3D printed masters. The most reliable way to prevent failure is to test cure a small area first, then pour the full mold.
В этом руководстве
If Your Platinum Silicone Stays Sticky, Start Here
When buyers say “the silicone failed,” what they often mean is this:
- The silicone stayed tacky near the master
- part of the mold cured, and part of it did not
- The surface touching the pattern remained soft
- or the cure time became abnormal for no obvious reason
This is usually not a random failure. It is often cure inhibition.
And in most cases, the real problem is not the silicone bucket. It is what touched the silicone.
Читайте также: Почему моя силиконовая резина отвердевает слишком быстро?
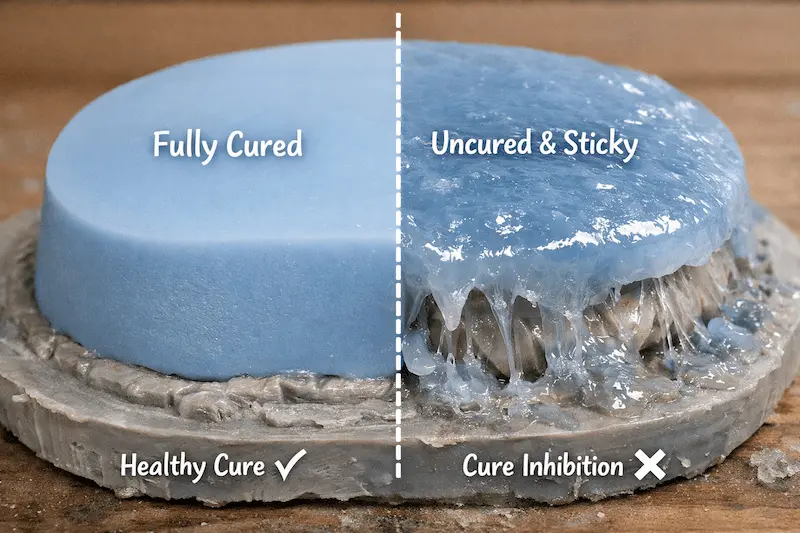
What does cure inhibition usually look like?
You may be dealing with cure inhibition if:
- The silicone cures normally in the cup, but not on the model
- The mold surface stays sticky after the expected cure time
- Only one contact zone fails
- The silicone skin near the master looks wet or undercured
- cure failure repeats on the same pattern but not on others
That pattern matters.
If the whole batch fails, the problem may be mixing or the process.
If the failure is concentrated at the master interface, inhibition is much more likely.
The Most Common Misdiagnosis
The most common wrong conclusion is:
“The mixing ratio must have been wrong.”
Sometimes that is true.
But in platinum cure mold making, a partial cure failure near the surface is more often a compatibility problem than a mixing problem.
That distinction matters, because many users waste another batch by remixing perfectly good silicone and pouring it onto the same untreated master.
1. The Most Common Causes of Cure Inhibition
Cure inhibition usually comes from incompatible materials or contamination on the master pattern.
Common risk sources include:
Sulfur-containing clay
A classic cause of platinum cure failure.
Latex
Natural latex can interfere with platinum systems.
Certain paints, sealers, or coatings
Not every coating is silicone-friendly, especially when not fully cured.
Uncured resin residue
This is a major issue in resin-printed masters and unfinished post-processing workflows.
Adhesives and surface chemicals
Glue residue, unknown cleaners, and shop-floor chemicals can all create risk.
Problematic 3D printed masters
Many 3D print failures blamed on “bad silicone” are actually surface preparation failures.
2. Why 3D-Printed Masters Cause So Many Problems
This deserves its own section because it is now one of the most common real-world causes.
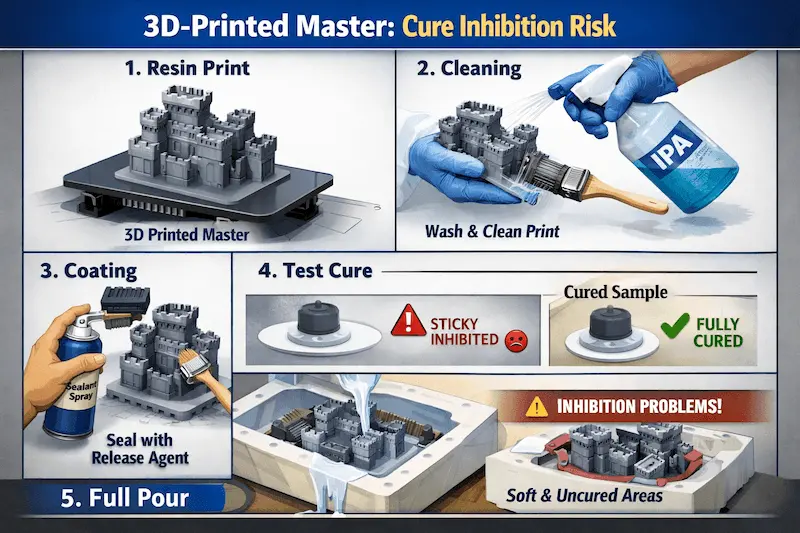
A resin 3D print may look ready, but still carry:
- uncured surface residue
- incompatible coating remnants
- support removal contamination
- incomplete cleaning
- or badly chosen sealing layers
That is why platinum silicone and 3D printed masters should never be treated as automatically compatible.
If the master is new, the process is new, or the surface finishing is uncertain, test cure first.
3. The Fastest Way to Prevent Cure Inhibition
The best prevention method is simple:
Do a small test cure first.
Do not pour the full mold first and hope it works.
Test cure first when:
- The master material is unfamiliar
- The surface was painted or sealed
- The model came from resin printing
- Sulfur clay or latex was used anywhere in the process
- The pattern was cleaned with unknown chemicals
- The workflow has changed since the last successful job
A small test saves material, time, and confidence.
4. A Simple Troubleshooting Checklist
If inhibition happens, go through this order:
Step 1
Check whether the failure is local or global.
If local, suspect the master surface first.
Step 2
Review the master material.
Was it clay, resin print, painted surface, latex, or coated pattern?
Step 3
Review everything that touched the surface.
Paint, sealer, release agent, cleaner, glue, tape, filler, primer.
Step 4
Clean, reseal, or isolate the master if needed.
Step 5
Run a fresh small-area test cure before repouring the full mold.
This order is much better than simply mixing more silicone and trying again.
Seeing Sticky or Uncured Areas?
If your silicone cures in the cup but fails on the model, the issue is often at the master surface. Start with a test-cure review before repeating the full pour.
5. What Buyers Often Get Wrong
Mistake 1: Assuming the platinum cure failed “by itself.”
Usually, something in the process triggered the problem.
Mistake 2: Skipping the test cure
This is the most avoidable mistake.
Mistake 3: Repeating the same pour on the same untreated master
That usually wastes more silicone without changing the outcome.
Mistake 4: Treating all 3D printed masters as safe
They are not automatically safe.
6. Does This Mean Platinum Cure Is Risky?
No. It means the platinum cure requires cleaner compatibility control.
That is an important difference.
Platinum cure is still widely chosen because it offers strong advantages in:
- dimensional stability
- lower shrinkage
- premium mold quality
- selected higher-end applications
The real takeaway is not “avoid platinum cure.”
The real takeaway is:
Use platinum cure with better testing discipline.
7. When You Should Consider Switching Approach
If your process repeatedly involves:
- uncertain printed masters
- uncontrolled coatings
- changing surfaces
- or unstable shop-floor prep,
Then your problem may be bigger than one failed mold.
In that case, you may need to improve:
- master preparation
- compatibility testing
- cleaning discipline
- or even your silicone system choice, depending on the project
This is especially important in commercial mold work, where repeatability matters more than a one-time success.
Окончательный ответ
Cure inhibition in platinum silicone is usually caused by incompatible surfaces, contamination, or poorly prepared masters, especially in resin print workflows.
If you want to avoid failed pours:
- Assume new masters are risky until tested
- treat surface preparation seriously
- Use small-area test cures first
- and troubleshoot the interface, not just the silicone
That is how experienced mold makers reduce waste and use platinum cure more safely.