
A good pad-printing silicone can still produce a defective printing pad.
The reason is that pad quality depends not only on the silicone specification, but also on how consistently the material is processed.
Incorrect weighing can affect curing. Aggressive mixing introduces unnecessary air. Excessive degassing can consume the remaining working time. Poor pouring can put bubbles back into material that was already degassed. Contamination can leave addition-cure silicone locally tacky even when the mixing ratio is correct.
The goal is therefore not simply to follow a sequence of steps.
It is to control the process.
Quick Answer: How Are Silicone Printing Pads Made?
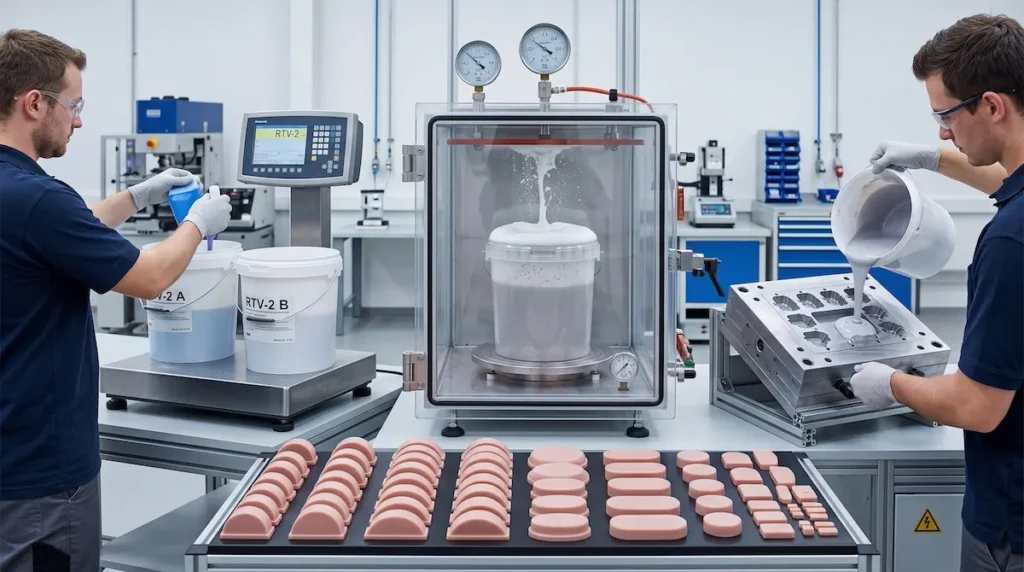
Silicone printing pads are typically made by accurately weighing the RTV-2 components, mixing them uniformly, adjusting hardness with silicone oil when required, vacuum-degassing the mixture, casting it slowly into a clean mold, and allowing it to cure under the correct catalyst and temperature conditions.
Five process variables deserve particular attention:
Ratio → Air → Time → Temperature → Contamination
A cured silicone pad is not automatically a production-qualified printing pad. The finished pad should still be inspected and tested under actual printing conditions.
View Topsil silicone Pad Printing Silicone Rubber →
Pad-Making Process Control at a Glance
| Process stage | Main control | Typical failure if poorly controlled |
| Weighing | A:B ratio accuracy | Slow, uneven or incomplete cure |
| Mezcla | Homogeneity without excessive air | Uneven hardness or excessive bubbles |
| Degassing | Air removal vs remaining working time | Internal voids or insufficient casting time |
| Casting | Controlled mold filling | Reintroduced air |
| Curado | Catalyst, temperature and compatibility | Under-cure or tacky areas |
| Final QC | Cure completeness and printing behavior | Deformation or unstable ink transfer |
The process sequence tells you what to do. Process control determines whether the same silicone produces consistent pads batch after batch.
Before Mixing: Prepare the Mold and Your Working-Time Budget
Before Parts A and B touch, make sure the mold and tools are:
- Limpiar
- Seco
- Free from incompatible residues
- Ready for immediate processing
- Properly treated with release agent where required
This is particularly important for addition-cure silicone because certain contaminants can interfere with the platinum-catalyzed curing reaction.
CHT’s technical guidance for addition-cure pad-printing silicone also warns that incompatible contact materials and contamination can inhibit cure.
When Does Working Time Start?
A common production mistake is assuming the published working time starts after vacuum degassing.
It does not.
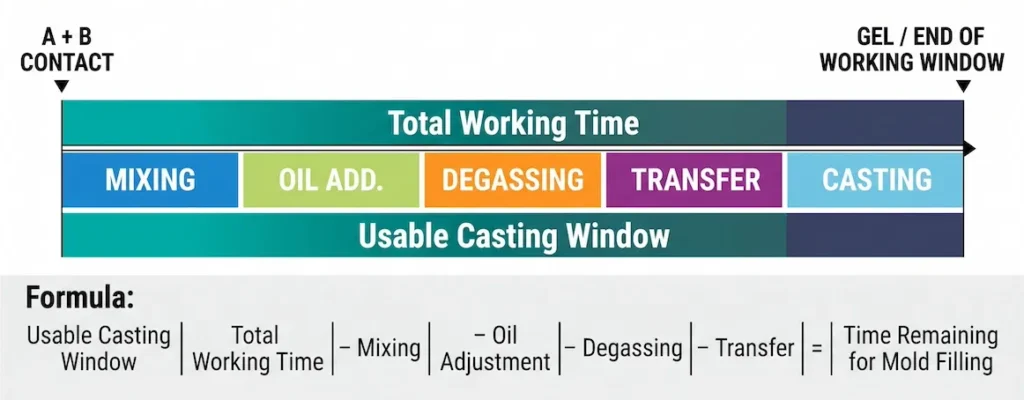
The practical working-time clock starts when Parts A and B come into contact.
For standard Topsil silicone PP-30/AP-30, the current reference is approximately 20–30 minutes at 25°C, with a 9A:1B mixing ratio by weight.
Your process window must therefore include:
Mixing + Oil Adjustment + Degassing + Transfer + Casting
A useful way to calculate the real casting window is:
Usable Casting Window
Total working time
− Mezcla
− Oil adjustment
− Degassing
− Transfer
=
Remaining time available for mold filling
This is why spending almost the entire working time trying to achieve “perfect” vacuum degassing can create another problem: rushed casting.
Mixing: Control the Ratio Before Anything Else
For PP-30 and AP-30:
Part A : Part B = 9 : 1 by weight
Use an accurate scale rather than estimating by volume.
Mix thoroughly enough to create a homogeneous formulation, but avoid unnecessarily aggressive stirring. High mixing speed introduces more air and increases the burden on the vacuum stage.
Scrape the sides and bottom of the vessel so that unmixed material does not remain around the container.
When Should Silicone Oil Be Added?
For the current Topsil silicone pad-making process:
Mix A + B → Add A100 silicone oil → Mix uniformly → Vacuum degas
A100 dosage is calculated against the total mixed weight of Part A + Part B before silicone oil is added.
Por ejemplo:
A + B = 10 kg A100 dosage = 20% A100 added = 2 kg
The current production recommendation for this pad-printing system is up to 30% silicone oil.
Higher A100 levels have also been tested internally to study hardness change, but those results are hardness-reference data rather than standard production recommendations, because mechanical performance has not been fully characterized at those higher oil levels.
For the complete hardness and oil-adjustment discussion:
Pad Printing Pad Hardness: Shore A vs Shore 00 →
Industry suppliers such as Elkem also describe silicone-oil dilution as a method for adjusting the hardness of RTV silicone used for printing pads.
Elkem — Silicones for Pad Printing
Vacuum Degassing: Watch the Silicone, Not Only the Timer
Air introduced during mixing can become:
- Surface bubbles
- Internal voids
- Defects around fine pad geometry
- Weak areas inside the finished pad
The current Topsil silicone processing reference is approximately:
−0.1 MPa for 3–6 minutes
However, degassing should not be controlled by a timer alone.
What Should You See Under Vacuum?
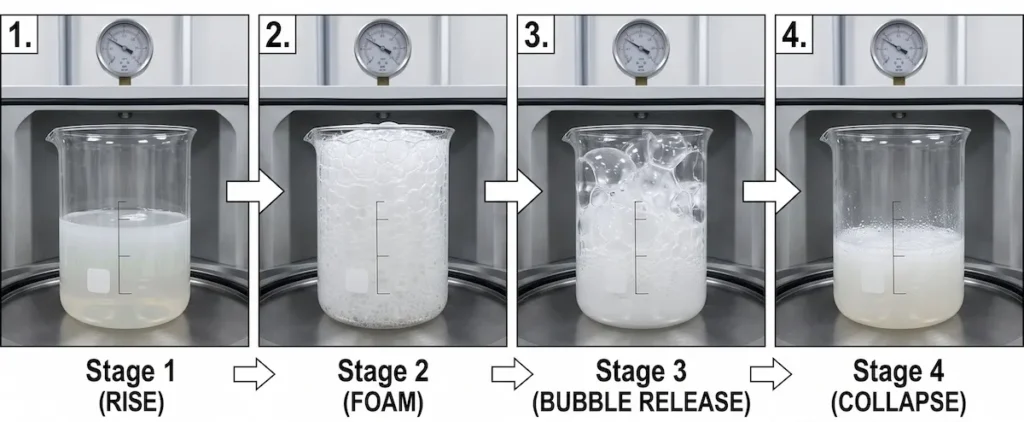
A typical batch moves through a visible sequence:
Rise → Foam → Bubble rupture → Collapse → Reduced fine bubbling
This behavior is useful because it tells the operator what is happening inside the material.
If the silicone is still expanding heavily and releasing large bubbles, substantial trapped air may remain.
Once the main foam has collapsed and bubbling is greatly reduced, continuing indefinitely may simply consume valuable working time.
Leave Enough Free Container Volume
Silicone can expand significantly under vacuum.
Use a vessel with generous free space above the material. If the foam approaches the rim, briefly reduce or release vacuum, allow the material to fall, and then continue.
The goal is not the longest possible vacuum cycle. The goal is sufficient air removal with enough working time left for controlled casting.
For larger production batches and vacuum-equipment selection:
How to Degas Platinum Silicone at Scale: Equipment & Cycle Guide →
Casting: Don’t Put the Air Back In
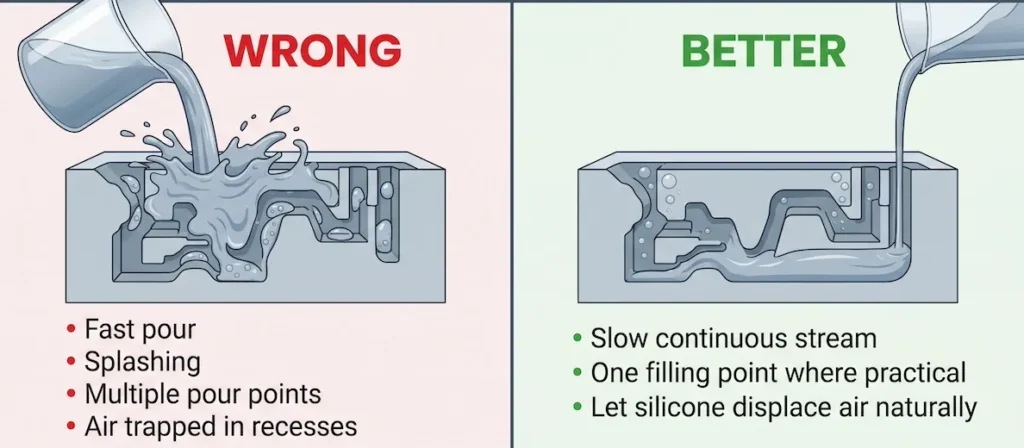
Degassing can be undone by poor pouring.
After vacuum treatment:
- Verter lentamente
- Use a continuous stream where practical
- Fill mainly from one location
- Allow the silicone to rise naturally through the mold
- Avoid splashing
- Avoid repeatedly stopping and restarting the pour
For deeper or more complex pad geometries, progressive filling can help the silicone displace air rather than trap it.
Avoid aggressively scraping foamy residue from the upper vessel wall into the mold.
Degassing removes air. Poor casting can put it back.
This is why vacuum treatment and casting should be viewed as one connected process.
Curing: Catalyst, Temperature and Compatibility All Matter
Topsil silicone pad-printing silicone can be supplied with different catalyst configurations to create different processing windows.
This is why different process instructions may show curing references such as:
4–6 hours
or:
8–24 hours
These figures apply to different medium-/slow-cure catalyst configurations rather than representing one universal cure time.
The practical rule is:
Follow the catalyst version and processing instruction supplied with the material you actually receive. Do not automatically apply the cure time of another PP-30/AP-30 configuration to your batch.
This becomes especially important with larger pads or production processes that need more time for mixing, degassing and mold filling.
Temperature Changes the Cure Window
Room-temperature curing data is temperature-dependent.
A colder workshop generally slows curing, while warmer conditions generally accelerate crosslinking.
That means a cure time measured at 25°C should not automatically be expected in a substantially colder production environment.
What If the Pad Is Still Tacky?
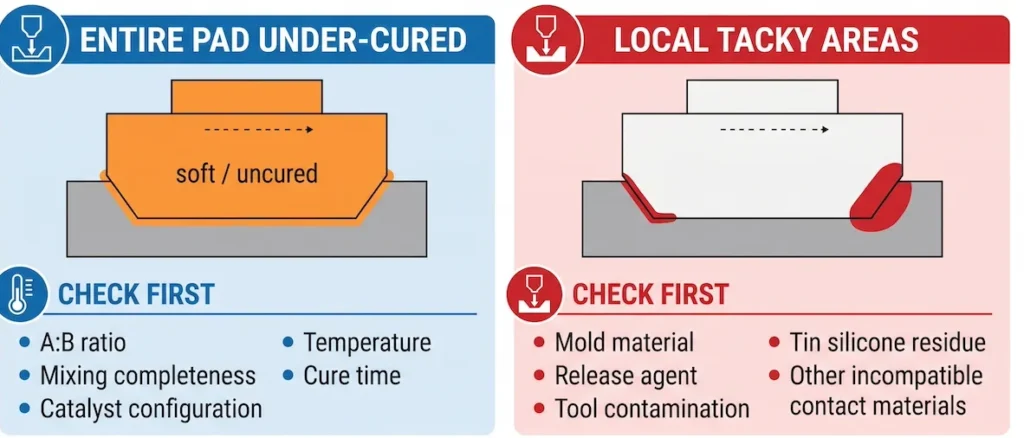
En pattern of the cure failure gives useful troubleshooting clues.
The Entire Pad Is Too Soft or Under-Cured
Check first:
- A:B ratio
- Mixing completeness
- Catalyst configuration
- Cure temperature
- Actual curing time
Only Certain Areas Are Tacky
A contact-compatibility or contamination issue becomes more likely.
Check:
- Mold material
- Agente de liberación
- Mixing tools
- Sulfur-containing materials
- Tin/condensation-silicone residues
Addition-cure inhibition from incompatible materials is well established in silicone processing.
When introducing a new mold, release agent or contact material, a small compatibility test is safer than discovering the problem after filling a full production mold.
Localized tackiness points more strongly toward contact contamination; uniform under-cure should first trigger checks of ratio, mixing, temperature and catalyst configuration.
This is a practical diagnostic direction, not an absolute rule.
Demold, Condition and Qualify the Finished Pad
Demolding is not the end of the process.
After the specified cure:
Demold → Trim → Inspect → Post-Demold Condition → Measure → Print-Test
The current Topsil silicone processing instruction recommends approximately 24 hours of post-demold conditioning before production use.
First-Pad Approval Checklist
| Check | What to confirm |
| Superficie | No critical bubbles, voids or contamination |
| Cura | No tacky or uncured zones |
| Geometry | No obvious deformation |
| Dureza | Within the intended finished-pad range |
| Edges | No obvious casting damage |
| Pad/base connection | Secure where applicable |
| Ink transfer | Stable pickup and release |
| Initial print trial | No abnormal early failure |
Cured does not mean qualified. Printing performance qualifies the pad.
Pad-Making Troubleshooting Matrix
| Problema | Likely process causes | First corrective direction |
| Many small bubbles | Aggressive mixing / insufficient degassing | Reduce air introduction and review vacuum cycle |
| Vacuum overflow | Vessel too full / vacuum applied too quickly | Increase free volume and control vacuum rise |
| Large internal voids | Incomplete degassing / poor casting | Review vacuum behavior and pouring |
| Uneven hardness | Poor A:B or oil distribution | Check weighing and mixing |
| Whole pad cures slowly | Low temperature / ratio / catalyst mismatch | Verify batch instruction and cure environment |
| Localized tacky areas | Cure inhibition / contact contamination | Check mold, tools and contact materials |
| Pad deforms after demolding | Insufficient cure | Review catalyst-specific cure window |
| Pad is softer than target | Oil calculation or formulation error | Recheck A100 dosage |
Before changing silicone grades, first confirm that the defect was not created during processing.
Preguntas frecuentes
Having Bubbles, Tacky Areas or Inconsistent Cure?
If your pad-making process produces bubbles, localized tackiness, uneven cure or repeated casting defects, review the material and process together before changing silicone grades.
Send Topsil silicone:
Current silicone grade + catalyst version + A:B ratio + silicone-oil dosage + batch size + vacuum conditions + cure temperature/time + pad photo + defect description
This gives the technical team enough information to identify whether the problem is more likely related to formulation, processing conditions or material compatibility.
Review My Pad-Making Process →
View PP-30 & AP-30 Pad Printing Silicone →
Read the Pad Hardness Guide →
Learn What Pad Printing Is →
Technical References
Elkem — Silicones for Pad Printing