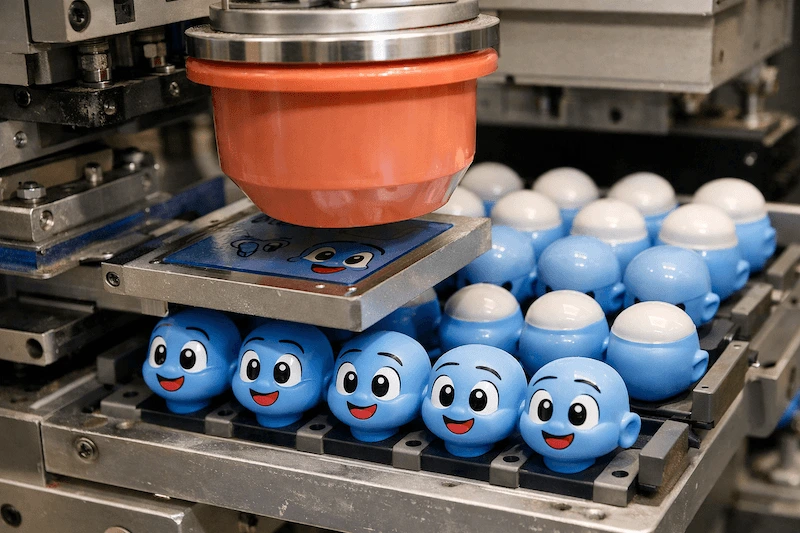

The pad contacts the cliché, but the image is incomplete.
Or the pad picks up the image correctly, yet much of the ink remains on the silicone after the print stroke.
Both may be described as:
“The pad is not transferring ink.”
But they are different failures.
Before changing silicone grade, pad hardness, thinner or machine settings, answer two questions:
Where did the ink stop moving?
and:
When did the problem start?
Those two observations usually narrow the troubleshooting path faster than changing several variables at once.
Quick Diagnosis: Pickup, Release or Adhesion?
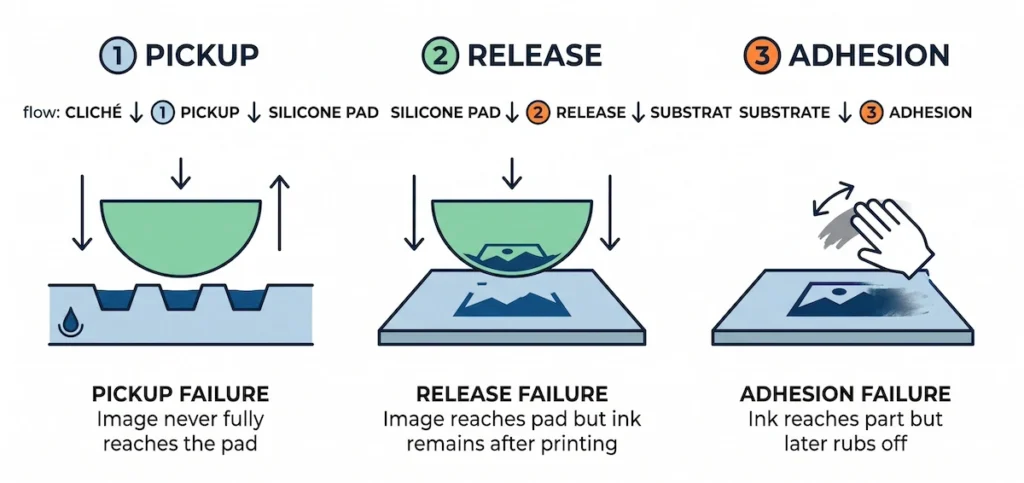
Pad printing can be viewed as three stages:
Cliché → Silicone Pad → Substrate
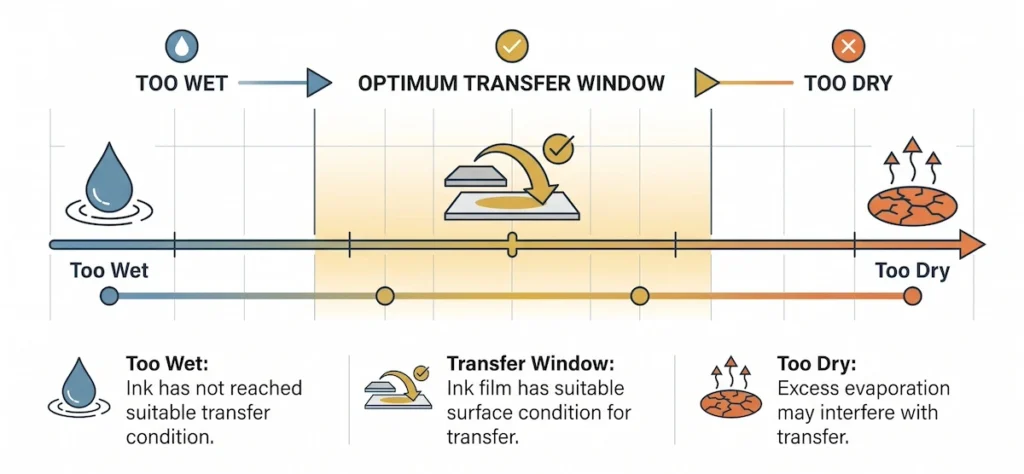
| What you observe | Failure stage | First direction |
| Little or no complete image on pad | Pickup | Pad surface, geometry/contact, ink/cliché |
| Full image on pad but ink remains after printing | Release | Pad surface, transfer condition, substrate |
| Ink reaches part but later rubs or scratches off | Adhesion | Ink/substrate compatibility, pretreatment, curing |
Then add a second clue:
If the problem exists from the first print
Prioritize preparation, geometry, setup and formulation.
If it develops during the production run
Prioritize contamination, ink-condition drift, temperature, airflow and cycle changes.
If it appears after extended pad use
Prioritize wear, surface damage and chemical exposure.
First identify where the ink stopped. Then use when the problem started to narrow the cause.
Why Won’t the Pad Pick Up Ink From the Cliché?
If the pad leaves the cliché with little, partial or inconsistent ink, the failure is in the cliché-to-pad pickup stage.
Check these areas before changing silicone formulation.
Check the Pad Surface
Inspect for:
- Dust
- Fingerprints
- Surface residue
- Dried ink
- Damage
- Improper first-use preparation
Some finished printing pads require supplier-specified first-use preparation or surface conditioning before stable transfer is achieved.
A new pad that performs poorly immediately should therefore not automatically be classified as defective silicone.
Follow the finished-pad manufacturer’s recommended preparation and cleaning procedure rather than using aggressive solvents by default.
Check Geometry and Contact
The pad must create suitable contact with the image area.
If the shape is too flat, poorly positioned or insufficiently compressed, it may fail to pick up the complete image even when the silicone material itself is acceptable.
Check:
- Pad shape and size
- Image position
- Compression
- Rolling contact
- Whether the same area repeatedly receives weak contact
A useful clue is where the image is missing.
If exactly the same region fails every cycle, compare the pad-contact pattern with the corresponding cliché area.
For broader pad selection:
Complete Pad Printing Silicone Selection Guide
Check Ink and Cliché Before Blaming the Pad
Pickup also depends on the ink film presented by the cliché.
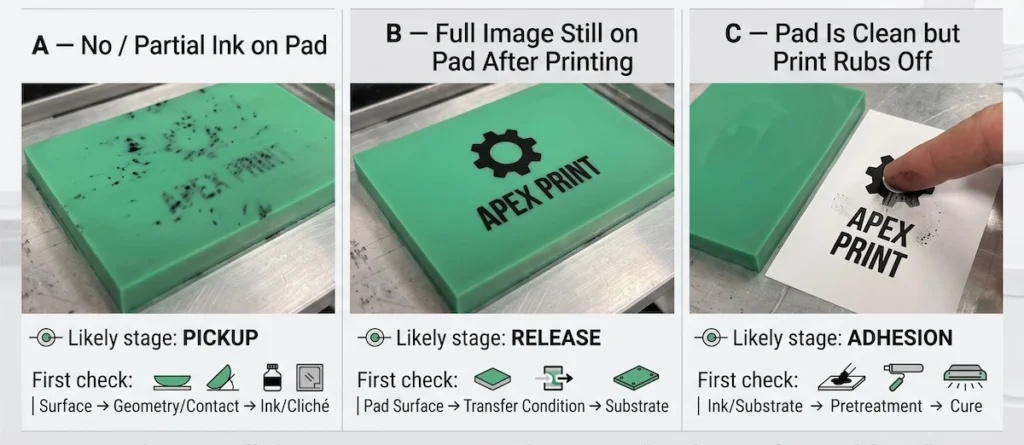
Both excessive and insufficient solvent evaporation can interfere with transfer:
Too Wet ← Usable Transfer Window → Too Dry
If the same section of the image is repeatedly missing, also inspect:
- Cliché/image condition
- Ink filling
- Doctoring
- Local contamination
The purpose here is not to turn pad troubleshooting into a complete ink or cliché diagnosis.
It is to verify that the pad is actually being presented with a transferable image before changing the pad material.
Inkcups — Pad Printing Resources
The Pad Picks Up Ink but Won’t Release It
If the image appears complete on the silicone pad after pickup, the first transfer stage worked.
Now focus on:
Pad → Substrate
This is where pad-side differences become particularly important.
Inspect the Pad Surface and Wear
Look for:
- Ink residue
- Dust
- Roughness
- Cuts
- Swelling
- Chemical attack
- Progressive wear
A pad may still look generally usable while its transfer consistency has already deteriorated.
If release was good initially but worsened over time, surface contamination or wear should move higher on the troubleshooting list.
Check the Ink Transfer Condition
The ink continues changing while the pad travels from the cliché to the substrate.
Release can deteriorate if the film reaches the part either too wet or too dry.
So the useful concept remains:
Too Wet ← Optimum Transfer Window → Too Dry
If release deteriorates during a production run, check whether something changed in:
- Cycle time
- Ambient temperature
- Airflow
- Ink viscosity
- Production pauses
Avoid changing the pad formulation and ink variables at the same time, otherwise it becomes difficult to identify the real cause.
Check the Receiving Surface
Sometimes the pad is capable of releasing ink, but the production substrate is the limiting interface.
Check for:
- Oil or grease
- Fingerprints
- Mold-release contamination
- Low surface energy
- Missing or inconsistent pretreatment
- Ink/substrate incompatibility
A useful comparison is to print with the same pad and ink onto a known-good substrate.
If release is clean there but poor on the production component, investigate the substrate before modifying the pad formulation.
A release problem can originate on the receiving surface—not only on the silicone pad.
Ink Transfers but Then Rubs Off? That Is Not a Pad-Release Failure
If the pad picks up the image, transfers it to the part and becomes relatively clean afterward, the pad has already completed the transfer step.
If the printed image then wipes, scratches or peels off, focus on:
- Ink/substrate compatibility
- Surface contamination
- Pretreatment
- Surface energy
- Drying or curing
If the pad has already released the ink, changing pad hardness is unlikely to solve an adhesion problem.
This diagnostic boundary prevents unnecessary changes to a pad that is already doing its job.
Is the Silicone Pad Actually the Problem?
Once the transfer stage has been identified, isolate the pad before changing several process variables.
Run a Known-Good Pad Comparison
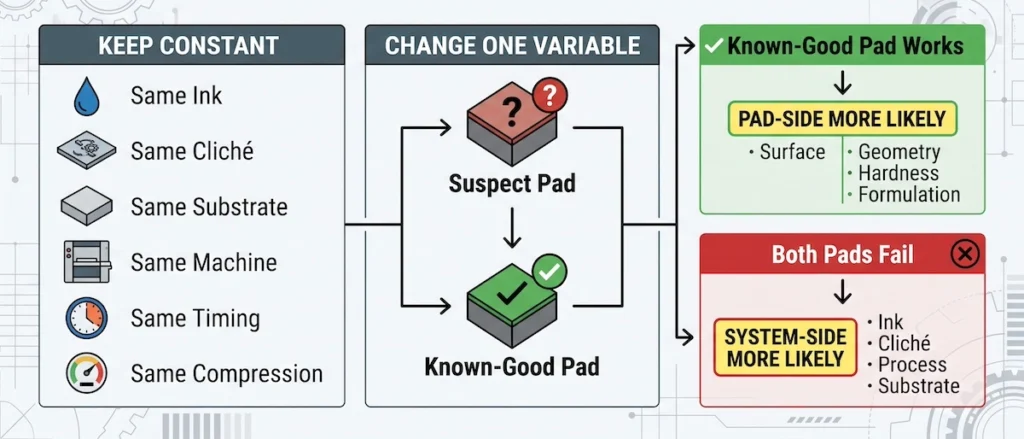
Keep the following as consistent as practical:
- Same ink
- Same cliché
- Same substrate
- Same machine
- Same cycle timing
- Same compression/stroke
- Similar ink condition
Then change only:
Suspect Pad → Known-Good Pad
If the Known-Good Pad Works
The cause becomes more likely to be on the pad side.
Check in this order:
4.1 Superficie
Inspect for residue, contamination, cuts, wear, roughness or cleaning damage.
4.2 Geometry and Compression
Compare pad shape, size, height, positioning and contact behavior with the successful pad.
4.3 Finished Hardness
Confirm:
- Actual finished hardness
- Shore scale
- Measurement condition
- Difference from the previous successful pad
Do not compare hardness numbers without confirming the scale.
Pad Printing Pad Hardness: Shore A vs Shore 00
4.4 Formulation and Manufacturing
If surface, geometry and hardness do not explain the change, review:
- Base silicone
- Silicone-oil dosage
- Catalyst/cure configuration
- Mezcla
- Degassing
- Casting
- Cure consistency
If the problem began after changing silicone or oil dosage, reproduce the previous known-good formulation as closely as possible and compare the two pads under the same printing conditions.
Silicone Oil Dosage for Pad Printing Silicone
How to Make Silicone Pads for Pad Printing
If Both Pads Fail Similarly
The cause is more likely elsewhere in the printing system.
Continue investigating the ink, cliché, timing, machine conditions or substrate instead of repeatedly changing the silicone.
If you change the pad, thinner, pressure and cycle speed at the same time, a good print does not tell you which change solved the problem.
30-Second Pad Printing Transfer Troubleshooting
| Symptom | Start here |
| No or partial image on pad | Pickup: surface → geometry/contact → ink/cliché |
| Full image on pad but ink remains after print | Release: surface → transfer condition → substrate |
| New pad fails immediately | Preparation → geometry → formulation/setup |
| Problem develops during the run | Contamination → ink/process drift |
| Only one pad fails | Run known-good pad comparison |
| All pads fail similarly | Investigate the wider printing system |
| Ink transfers but rubs off | Adhesion—not pad release |
The fastest troubleshooting sequence is therefore:
Where did the ink stop? → When did the problem start? → Compare a known-good pad → If pad-side, check Surface → Geometry → Hardness → Formulation.
Preguntas frecuentes
Suspect the Pad Is Causing Your Transfer Problem?
If your troubleshooting points toward the printing-pad side, send Topsil silicone:
- A 10–20 second video showing one complete cliché → pad → substrate cycle
- Current silicone grade
- Finished-pad hardness and Shore scale
- Silicone-oil dosage
- Pad photo / geometry
- Whether the pad is new or used
- Whether the problem is pickup or release
- Ink type
- Substrate
- When the problem started
This allows the problem to be reviewed in a logical order:
Surface → Geometry → Hardness → Formulation
rather than recommending another silicone grade before the failure has been isolated.
Review My Pad Transfer Problem →
View PP-30 & AP-30 Pad Printing Silicone →
Read the Pad Hardness Guide →
Read the Silicone Oil Dosage Guide →
Read the Pad-Making Process Guide →
Technical References
Inkcups — Pad Printing Resources
Printing International — Pad Printing
Struggling with ink transfer?
Send Topsil Silicone a 10–20 second video of your print cycle along with your pad details. We’ll help you systematically isolate the root cause.